Dimensionality
As we have mentioned in Building AMReX, the dimensionality of
AMReX must be set at compile time. A macro, AMREX_SPACEDIM, is defined to
be the number of spatial dimensions. C++ codes can also use the
amrex::SpaceDim variable. Fortran codes can use either the macro and
preprocessing or do
use amrex_fort_module, only : amrex_spacedim
The coordinate directions are zero-based.
Vector, Array, GpuArray, Array1D, Array2D, and Array3D
Vector class in AMReX_Vector.H is derived from std::vector. The
main difference between Vector and std::vector is that
Vector::operator[] provides bound checking when compiled with
DEBUG=TRUE.
Array class in AMReX_Array.H is simply an alias to std::array.
AMReX also provides GpuArray, a trivial type that works on both host
and device. (It was added when the minimal requirement for C++ standard was
C++11, for which std::array does not work on device.) It also works
when compiled just for CPU. Besides GpuArray, AMReX also
provides GPU-safe Array1D, Array2D and Array3D that are
1, 2 and 3-dimensional fixed size arrays, respectively. These three
class templates can have non-zero-based indexing.
Real
AMReX can be compiled to use either double precision (which is the default) or
single precision. amrex::Real is typedef’d to either double or
float. C codes can use amrex_real. They are defined in
AMReX_REAL.H. The data type is accessible in Fortran codes via
use amrex_fort_module, only : amrex_real
In C++, AMReX also provides a user literal _rt so that one can
have a proper type for constants (e.g., 2.7_rt).
Long
AMReX defines a 64-bit integer type amrex::Long that is an alias to
long on Unix-like systems and long long on Windows. In
C, the type alias is amrex_long. In Fortran, one can use
amrex_long defined in amrex_fort_module.
ParallelDescriptor
AMReX users do not need to use MPI directly. Parallel communication is often
handled by the data abstraction classes (e.g., MultiFab; see the section on
FabArray, MultiFab and iMultiFab). In addition, AMReX has provided the namespace
ParallelDescriptor in AMReX_ParallelDescriptor.H. The frequently
used functions include
int myproc = ParallelDescriptor::MyProc();  // Return the rank

int nprocs = ParallelDescriptor::NProcs();  // Return the number of processes

if (ParallelDescriptor::IOProcessor()) {
    // Only the I/O process executes this
}

int ioproc = ParallelDescriptor::IOProcessorNumber();  // I/O rank

ParallelDescriptor::Barrier();

// Broadcast 100 ints from the I/O Processor
Vector<int> a(100);
ParallelDescriptor::Bcast(a.data(), a.size(),
                    ParallelDescriptor::IOProcessorNumber())

// See AMReX_ParallelDescriptor.H for many other Reduce functions
ParallelDescriptor::ReduceRealSum(x);
Additionally, amrex_paralleldescriptor_module in
Src/Base/AMReX_ParallelDescriptor_F.F90 provides a number of
functions for Fortran.
ParallelContext
Users can also use groups of MPI subcommunicators to perform
simultaneous physics calculations. These comms are managed by AMReX’s
ParallelContext in AMReX_ParallelContext.H. It maintains a
stack of MPI_Comm handlers. A global comm is placed in the
ParallelContext stack during AMReX’s initialization and
additional subcommunicators can be handled by adding comms with
push(MPI_Comm) and removed using pop(). This creates a
hierarchy of MPI_Comm objects that can be used to split work as
the user sees fit. Note that ParallelDescriptor by default uses
AMReX’s base comm, independent of the status of the
ParallelContext stack.
ParallelContext also tracks and returns information about the
local (most recently added) and global MPI_Comm. The most common
access functions are given below. See AMReX_ParallelContext.H for
a full listing of the available functions.
MPI_Comm subCommA = ....;
MPI_Comm subCommB = ....;
// Add a communicator to ParallelContext.
// After these pushes, subCommB becomes the
//     "local" communicator.
ParallelContext::push(subCommA);
ParallelContext::push(subCommB);

// Get Global and Local communicator (subCommB).
MPI_Comm globalComm = ParallelContext::CommunicatorAll();
MPI_Comm localComm  = ParallelContext::CommunicatorSub();

// Get local number of ranks and global IO Processor Number.
int localRanks = ParallelContext::NProcsSub();
int globalIO     = ParallelContext::IOProcessorNumberAll();

if (ParallelContext::IOProcessorSub()) {
    // Only the local I/O process executes this
}

// Translation of global rank to local communicator rank.
// Returns MPI_UNDEFINED if comms do not overlap.
int localRank = ParallelContext::global_to_local_rank(globalrank);

// Translations of MPI rank IDs using integer arrays.
// Returns MPI_UNDEFINED if comms do not overlap.
ParallelContext::global_to_local_rank(local_array, global_array, n);
ParallelContext::local_to_global_rank(global_array, local_array, n);

// Remove the last added subcommunicator.
// This would make "subCommA" the new local communicator.
// Note: The user still needs to free "subCommB".
ParallelContext::pop();
Print
AMReX provides classes in AMReX_Print.H for printing messages to standard
output or any C++ ostream. The main reason one should use them instead
of std::cout is that messages from multiple processes or threads do not
get mixed up. Below are some examples.
Print() <<  "x = " << x << "\n"; // Print on I/O processor

Real pi = std::atan(1.0)*4.0;
// Print on rank 3 with precision of 17 digits
// SetPrecision does not modify cout's floating-point decimal precision setting.
Print(3).SetPrecision(17) << pi << "\n";

int oldprec = std::cout.precision(10);
Print() << pi << "\n";  // Print with 10 digits

AllPrint() << "Every process prints\n";  // Print on every process

std::ofstream ofs("my.txt", std::ofstream::out);
Print(ofs) << "Print to a file" << std::endl;
ofs.close();

AllPrintToFile("file.") << "Each process appends to its own file (e.g., file.3)\n";
It should be emphasized that Print() without any argument only
prints on the I/O process. A common mistake in using it for debug
printing is that one forgets that for non-I/O processes to print we should
use AllPrint() or Print(rank).
Enum Class
New in version 24.09: Enum class support.
AMReX provides AMREX_ENUM in AMReX_Enum.H for defining a
reflected enum class. Use AMREX_ENUM at namespace scope.
AMREX_ENUM(MyColor, red, green, blue);

void f ()
{
    MyColor color = amrex::getEnum<MyColor>("red"); // MyColor::red
    std::string name = amrex::getEnumNameString(MyColor::blue); // "blue"
    std::vector<std::string> names = amrex::getEnumNameStrings<MyColor>();
    // names = {"red", "green", "blue"};
    std::string class_name = amrex::getEnumClassName<MyColor>(); // "MyColor"
}
Use AMREX_ENUM_IN_CLASS for an enum class declared inside a class or
class template.
New in version 26.05: AMREX_ENUM_IN_CLASS.
struct Options {
    AMREX_ENUM_IN_CLASS(Solver, cg, bicgstab, gmres);
};

template <typename T>
struct State {
    AMREX_ENUM_IN_CLASS(Mode, init, run, stop);
};
AMREX_ENUM_IN_CLASS must be used inside a class definition. Use
AMREX_ENUM at namespace scope.
ParmParse
ParmParse in AMReX_ParmParse.H is a class providing a database for the
storage and retrieval of command-line and input-file arguments. When
amrex::Initialize(int& argc, char**& argv, ...) is called, the first command-line
argument after the executable name (if there is one, and it does not contain the character
‘=’ or start with ‘-’) is taken
to be the inputs file, and the contents of the file are used to initialize the
ParmParse database. The rest of the command-line arguments are also
parsed by ParmParse, with the exception of those following a ‘--’ which signals
command-line sharing (see section Sharing the Command Line).
Inputs File
The format of the inputs file is a series of definitions in the form of
prefix.name = value value .... For each line, text after # is a
comment. For values spanning multiple lines except for tables, one must use
\ at the end of a line for continuation, otherwise it’s a runtime
error. Note that there must be at least one space before the continuation
character \. Multiple lines inside a pair of double quotes are
considered a single string containing \ns. Here is an example inputs
file.
nsteps    = 100               # integer
nsteps    = 1000              # nsteps appears a second time
dt        = 0.03              # floating-point number
ncells    = 128 64 32         # a list of 3 ints
xrange    = -0.5 0.5          # a list of 2 reals
title     = "Three Kingdoms"  # a string
hydro.cfl = 0.8               # with prefix, hydro
my_2d_table = \
       # col 1      2      3
         {{ 11.0,  12.0,  13.0 }   # row 1
          { 21.0,  22.0,  23.0 }   # row 2
          { 31.0,  32.0,  33.0 }   # row 3
          { 41.0,  42.0,  43.0 } } # row 4
# or
my_2d_table = # col 1    2    3
                {{ 11,  12,  13 }   # row 1
                 { 21,  22,  23 }   # row 2
                 { 31,  32,  33 }   # row 3
                 { 41,  42,  43 } } # row 4
# or
my_2d_table = # col 1    2    3
                {{ 11,  12,  13 },   # row 1
                 { 21,  22,  23 },   # row 2
                 { 31,  32,  33 },   # row 3
                 { 41,  42,  43 }  } # row 4
The following code shows how to use ParmParse to get/query the values.
ParmParse pp;

int nsteps = 0;
pp.query("nsteps", nsteps);
amrex::Print() << nsteps << "\n";  // 1000

Real dt;
pp.get("dt", dt);  // runtime error if dt is not in inputs

Vector<int> numcells;
// The variable name 'numcells' can be different from parameter name 'ncells'.
pp.getarr("ncells", numcells);
amrex::Print() << numcells.size() << "\n";  // 3

Vector<Real> xr {-1.0, 1.0};
if (!pp.queryarr("xrange", xr)) {
    amrex::Print() << "Cannot find xrange in inputs, "
                   << "so the default {-1.0,1.0} will be used\n";
}

std::string title;
pp.query("title", title);  // query string

ParmParse pph("hydro");  // with prefix 'hydro'
Real cfl;
pph.get("cfl", cfl);    // get parameter with prefix

std::vector<std::vector<double>> my_2d_table;
pp.gettable("my_2d_table", my_2d_table);
Note that when there are multiple definitions for a parameter ParmParse
by default returns the last one. The difference between query and
get should also be noted. It is a runtime error if get fails to
get the value, whereas query returns an error code without generating a
runtime error that will abort the run.
Math Expressions
New in version 24.08: Math expression support in ParmParse.
ParmParse supports math expressions for integers and floating-point
numbers. For example,
# three numbers. whitespaces inside `""` are okay.
f = 3+4  99  "5 + 6"

# two numbers. `\` is for continuation
g = 3.1+4.1 \
    5.0+6.6

# two numbers unless using [query|get]WithParser
w = 1 -2

my_constants.alpha = 5.
amrex.c = c

# must use [query|get]WithParser
amrex.foo = sin( pi/2 ) + alpha + -amrex.c**2/c^2

# either [query|get] or [query|get]WithParser is okay
amrex.bar = sin(pi/2)+alpha+-amrex.c**2/c^2

geom.prob_lo = 2*sin(pi/4)/sqrt(2)  sin(pi/2)+cos(pi/2)  -(sin(pi*3/2)+cos(pi*3/2))

# three numbers. `\` is for continuation
geom.prob_hi =  "2*sin(pi/4)/sqrt(2)" \
                "sin(pi/2) + cos(pi/2)" \
                -(sin(pi*3/2)+cos(pi*3/2))
can be processed by
{
    ParmParse::SetParserPrefix("physical_constants");
    ParmParse pp("physical_constants");
    pp.add("c", 299792458.);
    pp.add("pi", 3.14159265358979323846);
}
{
    ParmParse pp;

    double f0 = -1;
    pp.query("f", f0);
    std::cout << " double f = " << f0 << '\n';

    std::vector<int> f;
    pp.queryarr("f", f);
    std::cout << " int f[3] = {" << f[0] << ", " << f[1] << ", "
              << f[2] << "}\n";

    std::vector<double> g;
    pp.queryarr("g", g);
    std::cout << " double g[] = " << g[0] << " " << g[1] << '\n';

    double w;
    pp.query("w", w);
    std::cout << " w = " << w << " with query\n";
    pp.queryWithParser("w", w);
    std::cout << " w = " << w << " with queryParser\n";
}
{
    ParmParse pp("amrex", "my_constants");
    double foo = -1, bar;
    pp.getWithParser("foo", foo);
    pp.get("bar", bar);
    std::cout << " foo = " << foo << ", bar = " << bar << '\n';
}
{
    ParmParse pp;
    std::array<double,3> prob_lo, prob_hi;
    pp.get("geom.prob_lo", prob_lo);
    pp.get("geom.prob_hi", prob_hi);
    std::cout << " double prob_lo[] = {" << prob_lo[0] << ", "
              << prob_lo[1] << ", " << prob_lo[2] << "}\n"
              << " double prob_hi[] = {" << prob_hi[0] << ", "
              << prob_hi[1] << ", " << prob_hi[2] << "}\n";
}
The results will be
double f = 7
int f[3] = {7, 99, 11}
double g[] = 7.2 11.6
w = 1 with query
w = -1 with queryParser
foo = 5, bar = 5
double prob_lo[] = {1, 1, 1}
double prob_hi[] = {1, 1, 1}
Note that spaces are significant for math expressions unless they
are inside a pair of " or explicitly parsed by
ParmParse::queryWithParser or ParmParse::getWithParser. If the
expression contains another variable, it will be looked up by
ParmParse. ParmParse’s constructor accepts an optional second
argument, parser_prefix. When a variable in a math expression is being
looked up, it will first try to find it by using the exact name of the
variable. If this attempt fails and the ParmParse object has a
non-empty non-static member parser_prefix, it will try again, this time
looking up the variable by prefixing its name with the value of
parser_prefix followed by a .. If this attempt also fails and the
ParmParse class has a non-empty static member ParserPrefix (which
can be set by ParmParse::SetParserPrefix), it will try again, this
time looking up the variable by prefixing its name with the value of
ParserPrefix followed by a ..
The variables in ParmParse math expressions are not evaluated until
they are referenced. If a variable is defined multiple times, the last
occurrence will override previous ones even if it appears after the variable
has been referenced. This behavior is demonstrated in the following example.
foo.a = 1
foo.b = foo.a
foo.a = 2
will become
foo.a = 2
foo.b = 2
Enum Class
New in version 24.09: Enum class support in ParmParse.
ParmParse can read enum types declared with AMREX_ENUM or
AMREX_ENUM_IN_CLASS (see Enum Class).
color1 = red
color2 = BLue
AMREX_ENUM(MyColor, none, red, green, blue);

ParmParse pp;
MyColor c1 = MyColor::none;
MyColor c2 = MyColor::none;

pp.query("color1", c1); // c1 becomes MyColor::red
pp.query_enum_case_insensitive("color2", c2); // c2 becomes MyColor::blue
Other Useful Functions
ParmParse provides several additional member functions:
queryAdd(name, ref)queries the database. If the name is found, its value is stored inref. If not, the current value ofrefis added to the database as a default. This is useful for setting parameter defaults inside functions (see Setting Parameter Values Inside Functions).getline(name, ref)/queryline(name, ref)retrieve the entire value list as a single whitespace-joined string. For example, if the input containsfoo = a b c, thengetline("foo", s)setssto"a b c", whereasget("foo", s)would setsto"a"only.queryAsDouble(name, ref)/getAsDouble(name, ref)parse the value as adoublemath expression and then cast the result to the type ofref(which can be an integer type). This avoids integer truncation issues when the expression involves division.eval(expr)evaluates a math expression string directly, looking up any unknown symbols in theParmParsedatabase.ParmParse pp; pp.add("two", 2.0); double result = pp.eval<double>("two * 3.14"); // 6.28
remove(name)removes a parameter from the database.contains(name)returnstrueif the parameter exists, without retrieving its value.
TOML-Like Features
Our ParmParse format is somewhat similar to TOML. A subset of TOML
can be processed by ParmParse. For a key/value pair, the key starts
with an alphabetical letter (a-zA-Z) followed by zero or more allowed
characters (alphabetical letters, numbers, _, -, and .).
In TOML, the same key cannot appear more than once. In ParmParse,
this is allowed and the last one will overwrite previous ones.
# Allowed in ParmParse, but do NOT do this if TOML compatibility is needed.
a = 1
a = 2
In ParmParse, quotes (") are optional for strings, whereas in TOML
they are required. In ParmParse, a basic string is a raw string. For
compatibility, you should avoid special escape sequences in strings. UTF-8
strings are allowed, but it might be better to avoid them unless it’s
absolutely necessary.
In TOML, arrays are values inside square brackets and they can be
nested. ParmParse supports TOML-like arrays and arrays of arrays, but
not more deeply nested arrays. ParmParse also does not support mixed
types in an array.
Although math expressions are allowed in ParmParse’s native array
format, they are not allowed in arrays started by square brackets.
a = [3+4, 5+6] # Not allowed
b = 3+4  5+6  # Allowed in ParmParse, but not in TOML. Same as b = [7,11].
Tables in TOML are started by headers (e.g., [amr] on a line). By default,
an entry before the table header is in the nameless top level table. Once a
table header is defined, it will continue until another one is introduced.
k = 1
p.k = 2

[a]
k = 3   # the full key/value pair is a.k = 3
b.k = 4 # the full key/value pair is a.b.k = 4

[b.c]
k = 5     # the full key/value pair is b.c.k = 5
d.e.k = 6 # the full key/value pair is b.c.d.e.k = 6
The file above is the same as the following:
k = 1
p.k = 2

a.k = 3
a.b.k = 4

b.c.k = 5
b.c.d.e.k = 6
In TOML, it’s not allowed to define a table more than once. But it’s allowed
in ParmParse. If you want compatibility with TOML, you should avoid it.
# Allowed in ParmParse, but do NOT do this if TOML compatibility is needed.
[a]
b = 1
[a.b]     # a.b already defined
c = 2
# Allowed in ParmParse, but do NOT do this if TOML compatibility is needed.
[a]
k = 1
[a]      # [a] already defined
b = 2
Including Another File
In ParmParse, you can use FILE = another_file to add the contents
of another file to the ParmParse database of key/value pairs. Note
that TOML-like table headers defined in the included file have no effect on
the current environment. Likewise, the included file also does not inherit
the active table header from the including file.
Overriding Parameters with Command-Line Arguments
It is sometimes convenient to
override parameters with command-line arguments without modifying the inputs
file. The command-line arguments after the inputs file are added later than the
file to the database and are therefore used by default. For example,
to change the value of ncells and hydro.cfl, one can
run with:
myexecutable myinputsfile ncells="64 32 16" hydro.cfl=0.9 my_string=\"A String\"
Note that the shell strips the quoting characters before the arguments reach
main(int argc, char** argv). The quotes in ncells="64 32 16" only
ensure that the spaces stay inside a single argument; the literal "
never arrives in argv. If you actually need to pass a single string
to the code (e.g., for my_string), you must escape them as shown
above. The example command line is equivalent to putting the following
entries in an inputs file:
ncells = 64 32 16
hydro.cfl = 0.9
my_string = "A String"
You can also remove the effect of having defined an input parameter at all using the
UNSET directive (parameters that are merely overridden will still be caught by
pp.contains() checks in code). Specifying keyword = 5 in an input file and
then UNSET = keyword subsequently in the input file or from the command line
completely removes keyword from the ParmParse table. Multiple keywords can
be removed simultaneously (UNSET = key1 key2 key3). if using the UNSET
directive with TOML-like input files, note that full parameter names must be used
even if the UNSET falls within a TOML table:
[x]
a = 1  # Same as x.a = 1 at the root level

UNSET = x.a # full name required to remove x.a entry
Setting Defaults via an Environment Variable
You can specify default parameter values using the environment variable
AMREX_DEFAULT_INIT. This is useful for setting site-wide or
machine-specific defaults in HPC job scripts without modifying
application input files or command-line arguments.
The parameter value precedence, from highest to lowest, is:
Function pointer passed to
amrex::Initialize(see Setting Parameter Values Inside Functions below)Command-line arguments
Input file settings
AMREX_DEFAULT_INITenvironment variable
The function pointer is called after all other sources have been parsed,
so values it sets with ParmParse::add take effect unconditionally.
However, the function can use ParmParse::queryAdd or check
ParmParse::contains before calling ParmParse::add,
effectively lowering its own precedence for that parameter.
Because AMREX_DEFAULT_INIT has the lowest precedence, it provides
defaults that can always be overridden by any of the other sources.
For example, on a machine where GPU-aware MPI is available, you can add the following to your job script:
export AMREX_DEFAULT_INIT="amrex.use_gpu_aware_mpi=1"
Multiple parameters can be set in a single value:
export AMREX_DEFAULT_INIT="amrex.envfoo=0 amrex.envbar=1 amrex.envabc=1 2 3 amrex.envstr=\"a b c\""
The above is equivalent to setting the following in the inputs file:
amrex.envfoo = 0
amrex.envbar = 1
amrex.envabc = 1 2 3
amrex.envstr = "a b c"
Setting Parameter Values Inside Functions
An application code may want to set values or defaults that differ from those in AMReX in a function. This is accomplished in two steps:
First, define a function that sets the variable(s).
Second, pass the name of that function to
amrex::Initialize.
The example function below sets variable values using different approaches to highlight subtle differences in implementation:
void add_par () {
   ParmParse pp("eb2");

   // `variable_one` can be overridden by an inputs file and/or command-line argument.
   if(not pp.contains("variable_one")) {
      pp.add("variable_one",false);
   }

   // Equivalent shorthand for the above: query first, add the default only if not found.
   bool variable_one_v2 = false;
   pp.queryAdd("variable_one_v2", variable_one_v2);

   // The inputs file or command-line arguments for `variable_two` are ignored.
   pp.add("variable_two",false);
};
First, this function, add_par, declares a ParmParse object that will be
used to set variables. In the next section of code, we check if the value for
variable_one has already been set elsewhere before writing to it. This
approach prevents the function
from overriding a value set in the inputs file or at the command line.
The queryAdd call for variable_one_v2 does the same thing more
concisely: it queries the database and, only if the parameter is not found,
adds the value of its ref argument as a default.
In the next section, we write a value to variable_two without a conditional
statement. In this case, we will ignore values for variable_two set in the
inputs file or as a command-line argument, effectively overriding them with
the value set here in the function.
In the second step, we pass the name of the function we defined to amrex::Initialize.
In the example above the function was called add_par, and therefore we write,
amrex::Initialize(argc, argv, add_par);
Now AMReX will use the user-defined function to appropriately set the desired values.
Command Line Flags
AMReX allows application codes to parse flags such as -h or --help
while still making use of ParmParse for parsing other runtime parameters, but only
if the flag is the first argument after the executable. If the first argument following
the executable name begins with a dash, AMReX will initialize without reading
any parameters and the application code may then parse the command line and
handle those cases. Several built-in functions are available to help do this.
They are briefly introduced in the table below.
Function |
Type |
Purpose |
|---|---|---|
|
String |
Get the entire command line. |
|
Int |
Get the number of command line arguments after the executable. |
|
String |
Returns the n-th argument after the executable. |
Parser
AMReX provides a parser in AMReX_Parser.H that can be used at runtime to
evaluate mathematical expressions given in the form of a string. The parser
compiles expressions into a compact executable form that can be evaluated
efficiently on both CPU and GPU. When compile is called, the parser
automatically performs constant folding and algebraic simplification.
Supported Operators and Functions
Arithmetic operators: +, -, *, /, ** (power), ^
(power).
Basic math functions: sqrt, abs, floor, ceil, fmod,
pow, min, max.
Exponential and logarithmic: exp, log, log10.
Trigonometric: sin, cos, tan, asin, acos, atan,
atan2.
Hyperbolic: sinh, cosh, tanh, asinh, acosh, atanh.
Special functions: erf, jn(n,x) (Bessel function of the first
kind of order n), yn(n,x) (Bessel function of the second kind of
order n), comp_ellint_1(k) and comp_ellint_2(k) (complete
elliptic integrals of the first and second kind).
Heaviside step function: heaviside(x1,x2) returns 0 when
x1 < 0, x2 when x1 = 0, and 1 when x1 > 0.
Conditional: if(a,b,c) returns b if a is nonzero (true),
c if a is zero (false).
Comparison operators: <, >, ==, !=, <=, >=.
Comparisons return 1.0 for true and 0.0 for false. They can be
chained (e.g., a < x < b is equivalent to a < x and x < b).
Logical operators: and, or. A value is considered true if it is
nonzero. The precedence of operators follows the convention of the C and C++
programming languages.
Basic Usage
Parser parser("if(a<x<b, sin(x)*cos(y)*if(z<0, 1.0, exp(-z)), .3*c**2)");
parser.setConstant("a", ...);
parser.setConstant("b", ...);
parser.setConstant("c", ...);
parser.registerVariables({"x","y","z"});
auto f = parser.compile<3>();  // 3 because there are three variables.

// ParserExecutor<3> f is thread-safe, and can be used in both host and
// device code. It takes 3 arguments in this example. The parser object
// must be alive for f to be valid.
for (int k = 0; ...) {
  for (int j = 0; ...) {
    for (int i = 0; ...) {
      my_array(i,j,k) = f(i*dx, j*dy, k*dz);
    }
  }
}
Constants are set with setConstant and are substituted into the
expression when compile is called (i.e., at parser compile time, not
C++ compile time). Variables are registered with
registerVariables and their values are provided at evaluation time.
The template parameter to compile must match the number of registered
variables.
If the compiled executor is only needed on the host, compileHost can
be used instead of compile to skip the GPU copy.
Local Variables
Local automatic variables can be defined in the expression. For example,
Parser parser("r2=x*x+y*y; r=sqrt(r2); cos(a+r2)*log(r)");
parser.setConstant("a", ...);
parser.registerVariables({"x","y"});
auto f = parser.compile<2>();  // 2 because there are two variables.
An assignment to a local variable must be terminated with ;. The final
expression in the string (without a trailing ;) is the return value.
One should avoid name conflicts between local variables and the constants set
by setConstant or the variables registered by registerVariables.
User-Defined Functions
User-defined functions with one to four arguments can be registered with the parser. When the parser encounters an unknown function name in the expression, it is treated as a user-defined function. The user must then register a function pointer (for both host and device) before compiling.
Parser parser("my_fn(x, y) + z");
parser.registerVariables({"x","y","z"});

// Register host and device function pointers for my_fn (2 arguments).
parser.registerUserFn2("my_fn", my_host_fn, my_device_fn);

auto f = parser.compile<3>();
The registration functions are registerUserFn1, registerUserFn2,
registerUserFn3, and registerUserFn4 for functions with one, two,
three, and four arguments, respectively. In CPU-only builds, either function
pointer argument may be nullptr and the non-null one will be used.
Querying the Parser
The Parser class provides several methods for introspection:
symbols()returns astd::set<std::string>of all variable names found in the expression (excluding local variables and constants already set).expr()returns the original expression string.print()prints the abstract syntax tree (AST) of the expression.printExe()prints the compiled instruction sequence.
Integer Parser
Besides amrex::Parser for floating-point numbers, AMReX also provides
amrex::IParser for integers. The two parsers have a lot of similarity,
but floating-point-specific functions (e.g., sqrt, sin, etc.)
are not supported in IParser. In addition to / whose result truncates
towards zero, the integer parser also supports // whose result truncates
towards negative infinity. Single quotes ' are allowed as a separator for
IParser numbers just like C++ integer literals. Additionally, a
floating-point-like number with a positive exponent may be accepted as an
integer if it is reasonable to do so. For example, it’s okay to have
1.234e3, but 1.234e2 is an error.
New in version 24.08: Support for
'andeinIParserintegers.
Thread Safety
Different Parser (or IParser) objects may be constructed
concurrently from multiple host threads. Once compiled, the
ParserExecutor or IParserExecutor returned by compile or
compileHost may be called concurrently from multiple threads or GPU
kernels. However, it is usually unnecessary and less efficient to construct one
parser per thread merely to evaluate an expression in parallel. Construct,
configure, and compile the parser once, then share the compiled executor while
keeping the owning parser object alive.
Initialize and Finalize
As we have mentioned, Initialize must be called to initialize
the execution environment for AMReX and Finalize must be paired
with Initialize to release the resources used by AMReX. There
are three versions of Initialize.
void Initialize (MPI_Comm mpi_comm,
                 std::ostream& a_osout = std::cout,
                 std::ostream& a_oserr = std::cerr,
                 ErrorHandler a_errhandler = nullptr,
                 int a_device_id = -1);

AMReX* Initialize (int& argc, char**& argv,
                   const std::function<void()>& func_parm_parse,
                   std::ostream& a_osout = std::cout,
                   std::ostream& a_oserr = std::cerr,
                   ErrorHandler a_errhandler = nullptr,
                   int a_device_id = -1);

void Initialize (int& argc, char**& argv, bool build_parm_parse=true,
                 MPI_Comm mpi_comm = MPI_COMM_WORLD,
                 const std::function<void()>& func_parm_parse = {},
                 std::ostream& a_osout = std::cout,
                 std::ostream& a_oserr = std::cerr,
                 ErrorHandler a_errhandler = nullptr,
                 int a_device_id = -1);
Initialize checks if MPI has been initialized. If it has, AMReX will
duplicate the MPI_Comm argument provided by the user in the first and
third versions or MPI_COMM_WORLD in the second version. If not, AMReX
will initialize MPI and ignore the MPI_Comm argument. Since AMReX 25.06,
MPI types are no longer placed in the global namespace in non-MPI builds to
avoid potential conflicts with other libraries. If you want to use MPI types
in non-MPI builds for convenience (e.g., calling
amrex::Initialize(MPI_COMM_WORLD)), you could add using
namespace amrex::mpidatatypes;.
All three versions accept two optional std::ostream parameters, one
for standard output in Print (section Print) and
the other for standard error. These streams can be accessed via functions
OutStream() and ErrorStream(). Each version can also take an
optional error handler function. If provided, AMReX will use it to handle
errors and signals; otherwise, it will use its own function for error and
signal handling.
The first version of Initialize does not parse the command-line
options. The second version builds the ParmParse database (section
ParmParse), and the third version does so as well unless
the build_parm_parse parameter is set to false. In both the
second and third versions, the user may also pass a function that adds
parameters to the ParmParse database instead of reading from the command line or
input file.
The last optional parameter, int a_device_id = -1, applies to
GPU builds only. By default, when multiple GPU devices are visible, AMReX
automatically selects one for you. In most cases, you should rely on this
default behavior and omit the optional argument. However, if another library
has already been initialized and assigned processes to specific devices, you
may need AMReX to use a particular GPU. In that case, you can pass the
desired device ID to amrex::Initialize. Conversely, if you want
another library to use the device selected by AMReX, you can obtain the
device ID by calling int amrex::Gpu::Device::deviceId().
Because many AMReX classes and functions (including destructors
inserted by the compiler) do not function properly after
amrex::Finalize is called, it’s best to put the code between
amrex::Initialize and amrex::Finalize into its own scope
(e.g., a pair of curly braces or a separate function) to make sure
resources are properly freed.
Example of AMR Grids
In block-structured AMR, there is a hierarchy of logically rectangular grids. The computational domain on each AMR level is decomposed into a union of rectangular domains. Fig. 1 below shows an example of AMR with three total levels. In the AMReX numbering convention, the coarsest level is level 0. The coarsest grid (black) covers the domain with \(16^2\) cells. Bold lines represent grid boundaries. There are two intermediate resolution grids (blue) at level 1 and the cells are a factor of two finer than those at level 0. The two finest grids (red) are at level 2 and the cells are a factor of two finer than the level 1 cells. There are 1, 2 and 2 Boxes on levels 0, 1, and 2, respectively. Note that there is no direct parent-child connection. In this chapter, we will focus on single levels.

Fig. 1 Example of AMR grids. There are three levels in total. There are 1, 2 and 2 Boxes on levels 0, 1, and 2, respectively.
Box, IntVect and IndexType
Box in AMReX_Box.H is the data structure for representing a rectangular
domain in indexing space. In Fig. 1, there are 1, 2 and
2 Boxes on levels 0, 1 and 2, respectively. Box is a
dimension-dependent class. It has lower and upper corners (represented by
IntVect) and an index type (represented by IndexType). A
Box contains no floating-point data.
IntVect
IntVect is a dimension-dependent class representing an integer vector in
AMREX_SPACEDIM-dimensional space. An IntVect can be constructed
as follows:
IntVect iv(AMREX_D_DECL(19, 0, 5));
Here AMREX_D_DECL is a macro that expands AMREX_D_DECL(19,0,5) to
either 19 or 19, 0 or 19, 0, 5 depending on the number of
dimensions. The data can be accessed via operator[], and the internal
data pointer can be returned by the function getVect. For example
for (int idim = 0; idim < AMREX_SPACEDIM; ++idim) {
    amrex::Print() << "iv[" << idim << "] = " << iv[idim] << "\n";
}
const int * p = iv.getVect();  // This can be passed to Fortran/C as an array
The class has a static function TheZeroVector() returning the zero
vector, TheUnitVector() returning the unit vector, and
TheDimensionVector (int dir) returning a reference to a constant
IntVect that is zero except in the dir-direction. Note the
direction is zero-based. IntVect has a number of relational operators,
==, !=, <, <=, >, and >= that can be
used for lexicographical comparison (e.g., key of std::map), and a class
IntVect::shift_hasher that can be used as a hash function (e.g., for
std::unordered_map). It also has various arithmetic operators. For
example,
IntVect iv(AMREX_D_DECL(19, 0, 5));
IntVect iv2(AMREX_D_DECL(4, 8, 0));
iv += iv2;  // iv is now (23,8,5)
iv *= 2;    // iv is now (46,16,10);
In AMR codes, one often needs to do refinement and coarsening on
IntVect. The refinement operation can be done with the multiplication
operation. However, the coarsening requires care because of the rounding
towards zero behavior of integer division in Fortran, C and C++. For example
int i = -1/2 gives i = 0, and what we want is usually i =
-1. Thus, one should use the coarsen functions:
IntVect iv(AMREX_D_DECL(127,127,127));
IntVect coarsening_ratio(AMREX_D_DECL(2,2,2));
iv.coarsen(2);                 // Coarsen each component by 2
iv.coarsen(coarsening_ratio);  // Component-wise coarsening
const auto& iv2 = amrex::coarsen(iv, 2); // Return an IntVect w/o modifying iv
IntVect iv3 = amrex::coarsen(iv, coarsening_ratio); // iv not modified
Finally, we note that operator<< is overloaded for IntVect and
therefore one can call
amrex::Print() << iv << "\n";
std::cout << iv << "\n";
IndexType
This class defines an index as being cell-based or node-based in each
dimension. The default constructor defines a cell-based type in all directions.
One can also construct an IndexType with an IntVect with zero and
one representing cell and node, respectively.
// Node in x-direction and cell-based in y and z-directions
// (i.e., x-face of numerical cells)
IndexType xface(IntVect{AMREX_D_DECL(1,0,0)});
The class provides various functions including
// True if the IndexType is cell-based in all directions.
bool cellCentered () const;

// True if the IndexType is cell-based in dir-direction.
bool cellCentered (int dir) const;

// True if the IndexType is node-based in all directions.
bool nodeCentered () const;

// True if the IndexType is node-based in dir-direction.
bool nodeCentered (int dir) const;
Index type is a very important concept in AMReX. It is a way of representing the notion of indices \(i\) and \(i+1/2\).
Box
A Box is an abstraction for defining discrete regions of
AMREX_SPACEDIM-dimensional indexing space. Boxes have an
IndexType and two IntVects representing the lower and upper
corners. Boxes can exist in positive and negative indexing space. Typical ways
of defining a Box are
IntVect lo(AMREX_D_DECL(64,64,64));
IntVect hi(AMREX_D_DECL(127,127,127));
IndexType typ({AMREX_D_DECL(1,1,1)});
Box cc(lo,hi);        // By default, Box is cell-based.
Box nd(lo,hi+1,typ);  // Construct a nodal Box.
Print() << "A cell-centered Box " << cc << "\n";
Print() << "An all nodal Box    " << nd << "\n";
Depending on the dimensionality, the output of the code above is
A cell-centered Box ((64,64,64) (127,127,127) (0,0,0))
An all nodal Box    ((64,64,64) (128,128,128) (1,1,1))
For simplicity, we will assume it is 3D for the rest of this section. In the
output, three integer tuples for each box are the lower corner indices, upper
corner indices, and the index types. Note that 0 and 1 denote cell and node,
respectively. For each tuple like (64,64,64), the 3 numbers are for 3
directions. The two Boxes in the code above represent different indexing views
of the same domain of \(64^3\) cells. Note that in AMReX convention, the
lower side of a cell has the same integer value as the cell centered index.
That is, if we consider a cell-based index to represent \(i\), the nodal index
with the same integer value represents \(i-1/2\).
Fig. 2 shows some of the different index types for 2D.
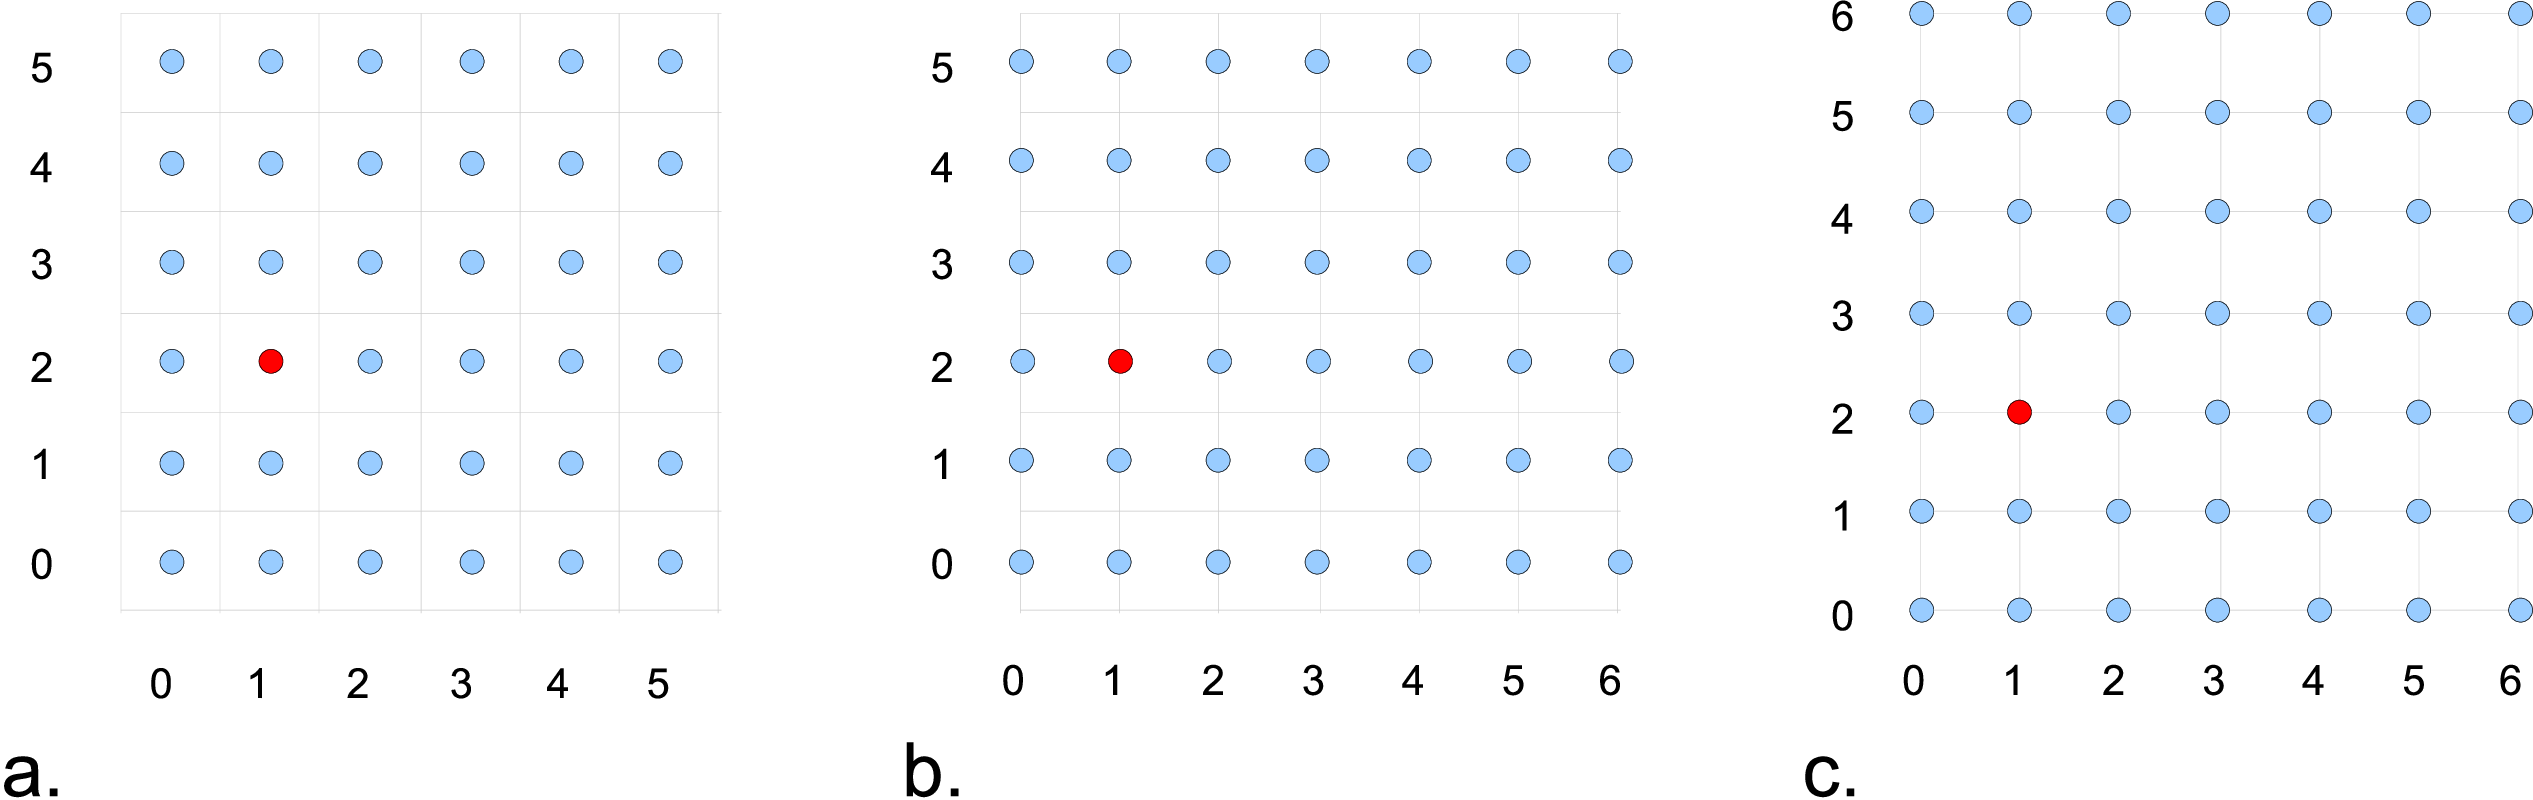
Fig. 2 Some of the different index types in two dimensions: (a) cell-centered, (b) \(x\)-face-centered (i.e., nodal in \(x\)-direction only), and (c) corner/nodal, i.e., nodal in all dimensions.
There are a number of ways of converting a Box from one type to another.
Box b0 ({64,64,64}, {127,127,127}); // Index type: (cell, cell, cell)

Box b1 = surroundingNodes(b0);  // A new Box with type (node, node, node)
Print() << b1;                  // ((64,64,64) (128,128,128) (1,1,1))
Print() << b0;                  // Still ((64,64,64) (127,127,127) (0,0,0))

Box b2 = enclosedCells(b1);     // A new Box with type (cell, cell, cell)
if (b2 == b0) {                 // Yes, they are identical.
   Print() << "b0 and b2 are identical!\n";
}

Box b3 = convert(b0, {0,1,0});  // A new Box with type (cell, node, cell)
Print() << b3;                  // ((64,64,64) (127,128,127) (0,1,0))

b3.convert({0,0,1});            // Convert b0 to type (cell, cell, node)
Print() << b3;                  // ((64,64,64) (127,127,128) (0,0,1))

b3.surroundingNodes();          //  Exercise for you
b3.enclosedCells();             //  Exercise for you
The internal data of Box can be accessed via various member functions.
Examples include:
const IntVect& smallEnd () const&;  // Get the small end of the Box
int bigEnd (int dir) const;         // Get the big end in dir direction
const int* loVect () const&;        // Get a const pointer to the lower end
const int* hiVect () const&;        // Get a const pointer to the upper end
Boxes can be refined and coarsened. Refinement or coarsening does not change the index type. Some examples are shown below.
Box ccbx ({16,16,16}, {31,31,31});
ccbx.refine(2);
Print() << ccbx;                   // ((32,32,32) (63,63,63) (0,0,0))
Print() << ccbx.coarsen(2);        // ((16,16,16) (31,31,31) (0,0,0))

Box ndbx ({16,16,16}, {32,32,32}, {1,1,1});
ndbx.refine(2);
Print() << ndbx;                   // ((32,32,32) (64,64,64) (1,1,1))
Print() << ndbx.coarsen(2);        // ((16,16,16) (32,32,32) (1,1,1))

Box facebx ({16,16,16}, {32,31,31}, {1,0,0});
facebx.refine(2);
Print() << facebx;                 // ((32,32,32) (64,63,63) (1,0,0))
Print() << facebx.coarsen(2);      // ((16,16,16) (32,31,31) (1,0,0))

Box uncoarsenable ({16,16,16}, {30,30,30});
Print() << uncoarsenable.coarsen(2); // ((8,8,8), (15,15,15));
Print() << uncoarsenable.refine(2);  // ((16,16,16), (31,31,31));
                                     // Different from the original!
Note that the behavior of refinement and coarsening depends on the
index type. A refined Box covers the same physical domain as
the original Box, and a coarsened Box also covers the
same physical domain if the original Box is coarsenable.
Box uncoarsenable in the example above is considered
uncoarsenable because its coarsened version does not cover the same
physical domain in the AMR context.
Boxes can grow in one or all directions. There are a number of grow functions.
Some are member functions of the Box class and others are free
functions in the amrex namespace.
The Box class provides the following member functions testing if a
Box or IntVect is contained within this Box. Note that it
is a runtime error if the two Boxes have different types.
bool contains (const Box& b) const;
bool strictly_contains (const Box& b) const;
bool contains (const IntVect& p) const;
bool strictly_contains (const IntVect& p) const;
Another very common operation is the intersection of two Boxes like in the following examples.
Box b0 ({16,16,16}, {31,31,31});
Box b1 ({ 0, 0,30}, {23,23,63});
if (b0.intersects(b1)) {                  // true
    Print() << "b0 and b1 intersect.\n";
}

Box b2 = b0 & b1;     // b0 and b1 unchanged
Print() << b2;        // ((16,16,30) (23,23,31) (0,0,0))

Box b3 = surroundingNodes(b0) & surroundingNodes(b1); // b0 and b1 unchanged
Print() << b3;        // ((16,16,30) (24,24,32) (1,1,1))

b0 &= b2;             // b2 unchanged
Print() << b0;        // ((16,16,30) (23,23,31) (0,0,0))

b0 &= b3;             // Runtime error because of type mismatch!
Dim3 and XDim3
Dim3 and XDim3 are plain structs with three fields,
struct Dim3 { int x; int y; int z; };
struct XDim3 { Real x; Real y; Real z; };
One can convert an IntVect to Dim3,
IntVect iv(...);
Dim3 d3 = iv.dim3();
Dim3 always has three fields even when AMReX is built for 1D or
2D. For the example above, the extra fields are set to zero. Given a
Box, one can get its lower and upper bounds and use them to
write dimension agnostic loops.
Box bx(...);
Dim3 lo = lbound(bx);
Dim3 hi = ubound(bx);
for     (int k = lo.z; k <= hi.z; ++k) {
  for   (int j = lo.y; j <= hi.y; ++j) {
    for (int i = lo.x; i <= hi.x; ++i) {
    }
  }
}
One can also call function Dim3 length(Box const&) to return the length of a Box.
RealBox and Geometry
A RealBox stores the physical location in floating-point numbers of the
lower and upper corners of a rectangular domain.
The Geometry class in AMReX_Geometry.H describes problem domain and
coordinate system for rectangular problem domains. A Geometry object can
be constructed with
explicit Geometry (const Box&     dom,
                   const RealBox* rb     = nullptr,
                   int            coord  = -1,
                   int*           is_per = nullptr) noexcept;

Geometry (const Box& dom, const RealBox& rb, int coord,
          Array<int,AMREX_SPACEDIM> const& is_per) noexcept;
Here the constructors take a cell-centered Box specifying the indexing
space domain, a RealBox specifying the
physical domain, an int specifying coordinate system type, and
an int pointer or array specifying periodicity. If a RealBox is not
given in the first constructor, AMReX will construct one based on ParmParse parameters,
geometry.prob_lo / geometry.prob_hi / geometry.prob_extent,
where each of the parameter is an array of AMREX_SPACEDIM real numbers.
See the section on Geometry for more details about how to specify these.
The argument for coordinate system is an integer type with
valid values being 0 (Cartesian), or 1 (cylindrical), or 2 (spherical). If it
is invalid as in the case of the default argument value of the first constructor, AMReX will query the
ParmParse database for geometry.coord_sys and use it if one is
found. If it cannot find the parameter, the coordinate system is set to 0
(i.e., Cartesian coordinates).
The Geometry class has the concept of
periodicity. An argument can be passed specifying periodicity in each
dimension. If it is not given in the first constructor, the domain is assumed to be non-periodic unless
there is the ParmParse integer array parameter geometry.is_periodic
with 0 denoting non-periodic and 1 denoting periodic. Below is an example of
defining a Geometry for a periodic rectangular domain of
\([-1.0,1.0]\) in each direction discretized with \(64\) numerical
cells in each direction.
int n_cell = 64;

// This defines a Box with n_cell cells in each direction.
Box domain(IntVect{AMREX_D_DECL(       0,        0,        0)},
           IntVect{AMREX_D_DECL(n_cell-1, n_cell-1, n_cell-1)});

// This defines the physical box, [-1,1] in each direction.
RealBox real_box({AMREX_D_DECL(-1.0,-1.0,-1.0)},
                 {AMREX_D_DECL( 1.0, 1.0, 1.0)});

// This says we are using Cartesian coordinates
int coord = 0;

// This sets the boundary conditions to be doubly or triply periodic
Array<int,AMREX_SPACEDIM> is_periodic {AMREX_D_DECL(1,1,1)};

// This defines a Geometry object
Geometry geom(domain, real_box, coord, is_periodic);
A Geometry object can return various information of the physical domain
and the indexing space domain. For example,
const auto problo = geom.ProbLoArray(); // Lower corner of the physical
                                        // domain.  The return type is
                                        // GpuArray<Real,AMREX_SPACEDIM>.
Real yhi = geom.ProbHi(1);              // y-direction upper corner
const auto dx = geom.CellSizeArray();   // Cell size for each direction.
const Box& domain = geom.Domain();      // Index domain
bool is_per = geom.isPeriodic(0);       // Is periodic in x-direction?
if (geom.isAllPeriodic()) {}            // Periodic in all direction?
if (geom.isAnyPeriodic()) {}            // Periodic in any direction?
BoxArray
BoxArray is a class in AMReX_BoxArray.H for storing a collection of
Boxes on a single AMR level. One can make a BoxArray out of a single
Box and then chop it into multiple Boxes.
Box domain(IntVect{0,0,0}, IntVect{127,127,127});
BoxArray ba(domain);  // Make a new BoxArray out of a single Box
Print() << "BoxArray size is " << ba.size() << "\n";  // 1
ba.maxSize(64);       // Chop into boxes of 64^3 cells
Print() << ba;
The output is like below,
(BoxArray maxbox(8)
       m_ref->m_hash_sig(0)
((0,0,0) (63,63,63) (0,0,0)) ((64,0,0) (127,63,63) (0,0,0))
((0,64,0) (63,127,63) (0,0,0)) ((64,64,0) (127,127,63) (0,0,0))
((0,0,64) (63,63,127) (0,0,0)) ((64,0,64) (127,63,127) (0,0,0))
((0,64,64) (63,127,127) (0,0,0)) ((64,64,64) (127,127,127) (0,0,0)) )
It shows that ba now has 8 Boxes, and it also prints out each Box.
In AMReX, BoxArray is a global data structure. It holds all the Boxes in
a collection, even though a single process in a parallel run only owns some of
the Boxes via domain decomposition. In the example above, a 4-process run may
divide the work and each process owns say 2 Boxes (see section
on DistributionMapping). Each process can then allocate memory for the
floating-point data on the Boxes it owns (see sections
on FabArray, MultiFab and iMultiFab & BaseFab, FArrayBox, IArrayBox, and Array4).
BoxArray has an indexing type, just like Box. Each Box in a
BoxArray has the same type as the BoxArray itself. In the following example, we
show how one can convert BoxArray to a different type.
BoxArray cellba(Box(IntVect{0,0,0}, IntVect{63,127,127}));
cellba.maxSize(64);
BoxArray faceba = cellba;       // Make a copy
faceba.convert(IntVect{0,0,1}); // convert to index type (cell, cell, node)
// Return an all node BoxArray
const BoxArray& nodeba = amrex::convert(faceba, IntVect{1,1,1});
Print() << cellba[0] << "\n";  // ((0,0,0) (63,63,63) (0,0,0))
Print() << faceba[0] << "\n";  // ((0,0,0) (63,63,64) (0,0,1))
Print() << nodeba[0] << "\n";  // ((0,0,0) (64,64,64) (1,1,1))
As shown in the example above, BoxArray has an operator[] that
returns a Box given an index. It should be emphasized that there is a
difference between its behavior and the usual behavior of a subscript operator
one might expect. The subscript operator in BoxArray returns by value
instead of reference. This means code like below is meaningless because it
modifies a temporary return value.
ba[3].coarsen(2); // DO NOT DO THIS! Doesn't do what one might expect.
BoxArray has a number of member functions that allow the Boxes to be
modified. For example,
BoxArray& refine (int refinement_ratio);   // Refine each Box in BoxArray
BoxArray& refine (const IntVect& refinement_ratio);
BoxArray& coarsen (int refinement_ratio);  // Coarsen each Box in BoxArray
BoxArray& coarsen (const IntVect& refinement_ratio);
We have mentioned at the beginning of this section that BoxArray is a
global data structure storing Boxes shared by all processes. The operation of
a deep copy is thus undesirable because it is expensive and the extra copy
wastes memory. The implementation of the BoxArray class uses
std::shared_ptr to an internal container holding the actual Box data.
Thus making a copy of BoxArray is a quite cheap operation. The
conversion of types and coarsening are also cheap because they can share the
internal data with the original BoxArray. In our implementation,
function refine does create a new deep copy of the original data. Also
note that a BoxArray and its variant with a different type share the
same internal data is an implementation detail. We discuss this so that the
users are aware of the performance and resource cost. Conceptually we can think
of them as completely independent of each other.
BoxArray ba(...);  // original BoxArray
BoxArray ba2 = ba; // a copy that shares the internal data with the original
ba2.coarsen(2);    // Modify the copy
// The original copy is unmodified even though they share internal data.
For advanced users, AMReX provides functions performing the intersection of a
BoxArray and a Box. These functions are much faster than a naive
implementation of performing intersection of the Box with each Box in the
BoxArray. If one needs to perform those intersections, functions
amrex::intersect, BoxArray::intersects and
BoxArray::intersections should be used.
DistributionMapping
DistributionMapping is a class in AMReX_DistributionMapping.H that
describes which process owns the data living on the domains specified by the
Boxes in a BoxArray. Like BoxArray, there is an element for each
Box in DistributionMapping, including the ones owned by other
parallel processes. One can construct a DistributionMapping object given
a BoxArray,
DistributionMapping dm {ba};
or by simply making a copy,
DistributionMapping dm {another_dm};
Note that this class is built using std::shared_ptr. Thus making a copy
is relatively cheap in terms of performance and memory resources. This class
has a subscript operator that returns the process ID at a given index.
By default, DistributionMapping uses an algorithm based on space filling
curve to determine the distribution. One can change the default via the
ParmParse parameter DistributionMapping.strategy. KNAPSACK is a
common choice that is optimized for load balance. One can also explicitly
construct a distribution. The DistributionMapping class allows the user
to have complete control by passing an array of integers that represent the
mapping of grids to processes.
DistributionMapping dm;   // empty object
Vector<int> pmap {...};
// The user fills the pmap array with the values specifying owner processes
dm.define(pmap);  // Build DistributionMapping given an array of process IDs.
BaseFab, FArrayBox, IArrayBox, and Array4
AMReX is a block-structured AMR framework. Although AMR introduces irregularity
to the data and algorithms, there is regularity at the block/Box level because
each is still logically rectangular, and the data structure at the Box level is
conceptually simple. BaseFab is a class template for multi-dimensional
array-like data structure on a Box. The template parameter is typically
basic types such as Real, int or char. The dimensionality
of the array is AMREX_SPACEDIM plus one. The additional dimension is for
the number of components. The data are internally stored in a contiguous block
of memory in Fortran array order (i.e., column-major order) for
\((x,y,z,\mathrm{component})\), and each component also occupies a
contiguous block of memory because of the ordering. For example, a
BaseFab<Real> with 4 components defined on a three-dimensional
Box(IntVect{-4,8,32},IntVect{32,64,48}) is like a Fortran array of
real(amrex_real), dimension(-4:32,8:64,32:48,0:3). Note that the
convention in the C++ part of AMReX is that the component index is zero-based. The code
for constructing such an object is as follows:
Box bx(IntVect{-4,8,32}, IntVect{32,64,48});
int numcomps = 4;
BaseFab<Real> fab(bx,numcomps);
Most applications do not use BaseFab directly, but utilize specialized
classes derived from BaseFab. The most common types are FArrayBox
in AMReX_FArrayBox.H derived from BaseFab<Real> and IArrayBox in
AMReX_IArrayBox.H derived from BaseFab<int>.
These derived classes also obtain many BaseFab member functions via
inheritance. We now show some common usages of these functions. To get the
Box where a BaseFab or its derived object is defined, one can
call
const Box& box() const;
To get the number of components, one can call
int nComp() const;
To get a pointer to the array data, one can call
T* dataPtr(int n=0);     // Data pointer to the nth component
                         // T is template parameter (e.g., Real)
const T* dataPtr(int n=0) const; // const version
The typical usage of the returned pointer is then to pass it to a Fortran or C
function that works on the array data (see the section on
Fortran and C++ Kernels). BaseFab has several functions that set the
array data to a constant value. Two examples are as follows.
void setVal(T x);        // Set all data to x
// Set the sub-region specified by bx to value x starting from component
// nstart.  ncomp is the total number of component to be set.
void setVal(T x, const Box& bx, int nstart, int ncomp);
One can copy data from one BaseFab to another.
BaseFab<T>& copy (const BaseFab<T>& src, const Box& srcbox, int srccomp,
                  const Box& destbox, int destcomp, int numcomp);
Here the function copies the data from the region specified by srcbox in
the source BaseFab src into the region specified by destbox in
the destination BaseFab that invokes the function call. Note that although
srcbox and destbox may be different, they must be the same size,
shape and index type, otherwise a runtime error occurs. The user also specifies
how many components (int numcomp) are copied starting at component
srccomp in src and stored starting at component destcomp. BaseFab has functions
returning the minimum or maximum value.
T min (int comp=0) const;  // Minimum value of given component.
T min (const Box& subbox, int comp=0) const; // Minimum value of given
                                             // component in given subbox.
T max (int comp=0) const;  // Maximum value of given component.
T max (const Box& subbox, int comp=0) const; // Maximum value of given
                                             // component in given subbox.
BaseFab also has many arithmetic functions. Here are some examples using
FArrayBox.
Box box(IntVect{0,0,0}, IntVect{63,63,63});
int ncomp = 2;
FArrayBox fab1(box, ncomp);
FArrayBox fab2(box, ncomp);
fab1.setVal(1.0);    // Fill fab1 with 1.0
fab1.mult(10.0, 0);  // Multiply component 0 by 10.0
fab2.setVal(2.0);    // Fill fab2 with 2.0
Real a = 3.0;
fab2.saxpy(a, fab1); // For both components, fab2 <- a * fab1 + fab2
These floating-point operations are templated with the parameter
RunOn specifying where they run, RunOn::Host or
RunOn::Device. When AMReX is built just for CPU, the
template parameter has a default value of RunOn::Host so that
the user does not need to specify it for backward compatibility,
and if RunOn::Device is provided it will be ignored.
However, when AMReX is built with GPU support, one must specify where
to run for these BaseFab functions. For example,
fab1.setVal<RunOn::Host>(1.0);    // Fill fab1 with 1.0
fab1.mult<RunOn::Device>(10.0, 0);  // Multiply component 0 by 10.0
For more complicated expressions that are not supported, one can write
Fortran or C/C++ functions for those (see the section
on Fortran and C++ Kernels). In C++, one can use Array4,
which is a class template for accessing BaseFab data in a more
array like manner using operator(). Below is an example of
using Array4.
FArrayBox afab(...), bfab(...);
IArrayBox ifab(...);
Array4<Real> const& a = afab.array();
Array4<Real const> const b = bfab.const_array();
Array4<int const> m = ifab.array();
Dim3 lo = lbound(a);
Dim3 hi = ubound(a);
int nc = a.nComp();
for (int n = 0; n < nc; ++n) {
  for     (int k = lo.z; k <= hi.z; ++k) {
    for   (int j = lo.y; j <= hi.y; ++j) {
      for (int i = lo.x; i <= hi.x; ++i) {
        if (m(i,j,k) > 0) {
          a(i,j,k,n) *= 2.0;
        } else {
          a(i,j,k,n) = 2.0*a(i,j,k,n) + 0.5*(b(i-1,j,k,n)+b(i+1,j,k,n));
        }
      }
    }
  }
}
Note that operator() of Array4 takes either three or
four arguments. The optional fourth argument has a default value of
zero. The two consts in Array4<Real const> const&
have different meaning. The first const inside <> means
the data accessed via Array4 is read-only, whereas the second
const means the Array4 object itself cannot be modified
to point to other data. In the example above, neither m(i,j,k) =
0 nor b(i,j,k) = 0.0 is allowed. However one is allowed to do
m = ifab2.array() to assign m again, but not to b.
The behavior is in some sense similar to double const * const p.
BaseFab and its derived classes are containers for data on Box.
Recall that Box has various types (see the section on Box, IntVect and IndexType).
The examples in this section so far use the default cell-based type. However,
some functions will result in a runtime error if the types mismatch. For
example.
Box ccbx ({16,16,16}, {31,31,31});           // cell centered box
Box ndbx ({16,16,16}, {31,31,31}, {1,1,1});  // nodal box
FArrayBox ccfab(ccbx);
FArrayBox ndfab(ndbx);
ccfab.setVal(0.0);
ndfab.copy(ccfab);   // runtime error due to type mismatch
Because it typically contains a lot of data, BaseFab’s copy constructor and
copy assignment operator are disabled to prevent performance degradation. However, BaseFab does
provide a move constructor. In addition, it also provides a constructor for
making an alias of an existing object. Here is an example using
FArrayBox.
FArrayBox orig_fab(box, 4);  // 4-component FArrayBox
// Make a 2-component FArrayBox that is an alias of orig_fab
// starting from component 1.
FArrayBox alias_fab(orig_fab, amrex::make_alias, 1, 2);
In this example, the alias FArrayBox has only two components even though
the original one has four components. The alias has a sliced component view of
the original FArrayBox. This is possible because of the array ordering.
However, it is not possible to slice in the real space (i.e., the first
AMREX_SPACEDIM dimensions). Note that no new memory is allocated in
constructing the alias and the alias contains a non-owning pointer. It should
be emphasized that the alias will contain a dangling pointer after the original
FArrayBox reaches its end of life. One can also construct an
alias BaseFab given an Array4,
Array4<Real> const a = orig_fab.array();
FArrayBox alias_fab(a);
FabArray, MultiFab and iMultiFab
FabArray<FAB> is a class template in AMReX_FabArray.H for a collection
of FABs on the same AMR level associated with a BoxArray (see the
section on BoxArray). The template parameter FAB is usually
BaseFab<T> or its derived classes (e.g., FArrayBox). However, FabArray
can also be used to hold other data structures. To construct a FabArray, a
BoxArray must be provided because the FabArray is intended to hold grid data
defined on a union of rectangular regions embedded in a uniform index space.
For example, a FabArray object can be used to hold data for one level as in
Fig. 1.
FabArray is a parallel data structure in which the data (i.e., FAB) are
distributed among parallel processes. For each process, a FabArray contains
only the FAB objects owned by that process, and the process operates only on
its local data. For operations that require data owned by other processes,
remote communications are involved. Thus, the construction of a FabArray
requires a DistributionMapping (see the section on DistributionMapping)
that specifies which process owns which Box. For level 2 (red) in
Fig. 1, there are two Boxes. Suppose there are two
parallel processes, and we use a DistributionMapping that assigns one Box to
each process. Then the FabArray on each process is built on the
BoxArray with both Boxes, but contains only the FAB associated with its process.
In AMReX, there are some specialized classes derived from FabArray. The
iMultiFab class in AMReX_iMultiFab.H is derived from
FabArray<IArrayBox>. The most commonly used FabArray kind class
is MultiFab in AMReX_MultiFab.H derived from FabArray<FArrayBox>.
In the rest of this section, we use MultiFab as example. However, these
concepts are equally applicable to other types of FabArrays. There are many
ways to define a MultiFab. For example,
// ba is BoxArray
// dm is DistributionMapping
int ncomp = 4;
int ngrow = 1;
MultiFab mf(ba, dm, ncomp, ngrow);
Here we define a MultiFab with 4 components and 1 ghost cell. A MultiFab
contains a number of FArrayBoxes (see the section
on BaseFab, FArrayBox, IArrayBox, and Array4) defined on Boxes grown by the number of ghost cells
(1 in this example). That is the Box in the FArrayBox is not
exactly the same as in the BoxArray. If the BoxArray has a
Box{(7,7,7) (15,15,15)}, the one used for constructing FArrayBox
will be Box{(6,6,6) (16,16,16)} in this example. For cells in
FArrayBox, we call those in the original Box valid cells and
the grown part ghost cells. Note that FArrayBox itself does not have
the concept of ghost cells. Ghost cells are a key concept of
MultiFab, however, that allows for local operations on ghost cell data
originated from remote processes. We will discuss how to fill ghost cells with
data from valid cells later in this section. MultiFab also has a
default constructor. One can define an empty MultiFab first and then
call the define function as follows.
MultiFab mf;
// ba is BoxArray
// dm is DistributionMapping
int ncomp = 4;
int ngrow = 1;
mf.define(ba, dm, ncomp, ngrow);
Given an existing MultiFab, one can also make an alias MultiFab
as follows.
// orig_mf is an existing MultiFab
int start_comp = 3;
int num_comps = 1;
MultiFab alias_mf(orig_mf, amrex::make_alias, start_comp, num_comps);
Here the first integer parameter is the starting component in the original
MultiFab that will become component 0 in the alias MultiFab and
the second integer parameter is the number of components in the alias. It’s a
runtime error if the sum of the two integer parameters is greater than the
number of the components in the original MultiFab. Note that the alias MultiFab
has exactly the same number of ghost cells as the original MultiFab.
We often need to build new MultiFabs that have the same BoxArray and
DistributionMapping as a given MultiFab. Below is an example of how to
achieve this.
// mf0 is an already defined MultiFab
const BoxArray& ba = mf0.boxArray();
const DistributionMapping& dm = mf0.DistributionMap();
int ncomp = mf0.nComp();
int ngrow = mf0.nGrow();
MultiFab mf1(ba,dm,ncomp,ngrow);  // new MF with the same ncomp and ngrow
MultiFab mf2(ba,dm,ncomp,0);      // new MF with no ghost cells
// new MF with 1 component and 2 ghost cells
MultiFab mf3(mf0.boxArray(), mf0.DistributionMap(), 1, 2);
As we have repeatedly mentioned in this chapter that Box and
BoxArray have various index types. Thus, MultiFab also has an
index type that is obtained from the BoxArray used for defining the
MultiFab. It should be noted again that index type is a very important
concept in AMReX. Let’s consider an example of a finite-volume code, in which
the state is defined as cell averaged variables and the fluxes are defined as
face averaged variables.
// ba is cell-centered BoxArray
// dm is DistributionMapping
int ncomp = 3;  // Suppose the system has 3 components
int ngrow = 0;  // no ghost cells
MultiFab state(ba, dm, ncomp, ngrow);
MultiFab xflux(amrex::convert(ba, IntVect{1,0,0}), dm, ncomp, 0);
MultiFab yflux(amrex::convert(ba, IntVect{0,1,0}), dm, ncomp, 0);
MultiFab zflux(amrex::convert(ba, IntVect{0,0,1}), dm, ncomp, 0);
Here all MultiFabs use the same DistributionMapping, but their
BoxArrays have different index types. The state is cell-based, whereas
the fluxes are on the faces. Suppose the cell-based BoxArray contains a
Box{(8,8,16), (15,15,31)}. The state on that Box is conceptually
a Fortran Array with the dimension of (8:15,8:15,16:31,0:2). The
fluxes are arrays with slightly different indices. For example, the
\(x\)-direction flux for that Box has the dimension of
(8:16,8:15,16:31,0:2). Note there is an extra element in
\(x\)-direction.
The MultiFab class provides many functions performing common arithmetic
operations on a MultiFab or between MultiFabs built with the
same BoxArray and DistributionMap. For example,
Real dmin = mf.min(3);   // Minimum value in component 3 of MultiFab mf
                         // no ghost cells included
Real dmax = mf.max(3,1); // Maximum value in component 3 of MultiFab mf
                         // including 1 ghost cell
mf.setVal(0.0);          // Set all values to zero including ghost cells

MultiFab::Add(mfdst, mfsrc, sc, dc, nc, ng);  // Add mfsrc to mfdst
MultiFab::Copy(mfdst, mfsrc, sc, dc, nc, ng); // Copy from mfsrc to mfdst
// MultiFab mfdst: destination
// MultiFab mfsrc: source
// int      sc   : starting component index in mfsrc for this operation
// int      dc   : starting component index in mfdst for this operation
// int      nc   : number of components for this operation
// int      ng   : number of ghost cells involved in this operation
//                 mfdst and mfsrc may have more ghost cells
We refer the reader to amrex/Src/Base/AMReX_MultiFab.H and
amrex/Src/Base/AMReX_FabArray.H for more details. It should be noted again
it is a runtime error if the two MultiFabs passed to functions like
MultiFab::Copy are not built with the same BoxArray (including
index type) and DistributionMapping.
It is usually the case that the Boxes in the BoxArray used for building
a MultiFab are non-intersecting except that they can be overlapping due
to nodal index type. However, MultiFab can have ghost cells, and in that
case FArrayBoxes are defined on Boxes larger than the Boxes in the
BoxArray. Parallel communication is then needed to fill the ghost cells
with valid cell data from other FArrayBoxes possibly on other parallel
processes. The function for performing this type of communication is
FillBoundary.
MultiFab mf(...parameters omitted...);
Geometry geom(...parameters omitted...);
mf.FillBoundary();                    // Fill ghost cells for all components
                                      // Periodic boundaries are not filled.
mf.FillBoundary(geom.periodicity());  // Fill ghost cells for all components
                                      // Periodic boundaries are filled.
mf.FillBoundary(2, 3);        // Fill 3 components starting from component 2
mf.FillBoundary(geom.periodicity(), 2, 3);
Note that FillBoundary does not modify any valid cells. Also note that
MultiFab itself does not have the concept of periodic boundary, but
Geometry has, and we can provide that information so that periodic
boundaries can be filled as well. You might have noticed that a ghost cell
could overlap with multiple valid cells from different FArrayBoxes in the case
of nodal index type. In that case, it is unspecified which valid cell’s
value is used to fill the ghost cell. It ought to be the case the values in
those overlapping valid cells are the same up to roundoff errors. If
a ghost cell does not overlap with any valid cells, its value will not
be modified by FillBoundary.
Another type of parallel communication is copying data from one MultiFab
to another MultiFab with a different BoxArray or the same
BoxArray with a different DistributionMapping. The data copy is
performed on the regions of intersection. The most generic interface for this
is
mfdst.ParallelCopy(mfsrc, compsrc, compdst, ncomp, ngsrc, ngdst, period, op);
Here mfdst and mfsrc are destination and source MultiFabs,
respectively. Parameters compsrc, compdst, and ncomp are
integers specifying the range of components. The copy is performed on
ncomp components starting from component compsrc of mfsrc
and component compdst of mfdst. Parameters ngsrc and
ngdst specify the number of ghost cells involved for the source and
destination, respectively. Parameter period is optional, and by default
no periodic copy is performed. Like FillBoundary, one can use
Geometry::periodicity() to provide the periodicity information. The last
parameter is also optional and is set to FabArrayBase::COPY by default.
One could also use FabArrayBase::ADD. This determines whether the
function copies or adds data from the source to the
destination. Similar to FillBoundary, if a destination cell has
multiple cells as source, it is unspecified which source cell is used in
FabArrayBase::COPY, and, for FabArrayBase::ADD, the multiple
values are all added to the destination cell. This function has two
variants, in which the periodicity and operation type are also optional.
mfdst.ParallelCopy(mfsrc, period, op);  // mfdst and mfsrc must have the same
                                        // number of components
mfdst.ParallelCopy(mfsrc, compsrc, compdst, ncomp, period, op);
Here the number of ghost cells involved is zero, and the copy is performed on all components if unspecified (assuming the two MultiFabs have the same number of components).
Both ParallelCopy(...) and FillBoundary(...) are blocking calls. They
will only return when the communication is completed and the destination MultiFab is
guaranteed to be properly updated. AMReX also provides non-blocking versions of
these calls to allow users to overlap communication with calculation and potentially
improve overall application performance.
The non-blocking calls are used by calling the ***_nowait(...) function
to begin the comm operation, followed by the ***_finish() function at a later
time to complete it. For example:
mfA.ParallelCopy_nowait(mfsrc, period, op);

// ... Any overlapping calc work here on other data, e.g.
mfB.setVal(0.0);

mfA.ParallelCopy_finish();

mfB.FillBoundary_nowait(period);
// ... Overlapping work here
mfB.FillBoundary_finish();
All function signatures of the blocking calls are also available in the non-blocking
calls and should be used in the nowait function. The finish functions take no
parameters, as the required data is stored during nowait and retrieved. Users that
choose to use non-blocking calls must ensure the calls are properly used to avoid race
conditions, which typically means not interacting with the MultiFab between the
_nowait and _finish calls.
MFIter and Tiling
In this section, we will first show how MFIter works without tiling.
Then we will introduce the concept of logical tiling. Finally we will show how
logical tiling can be launched via MFIter.
MFIter without Tiling
In the section on FabArray, MultiFab and iMultiFab, we have shown some of the
arithmetic functionalities of MultiFab, such as adding two MultiFabs
together. In this section, we will show how you can operate on the
MultiFab data with your own functions. AMReX provides an iterator,
MFIter for looping over the FArrayBoxes in MultiFabs. For example,
for (MFIter mfi(mf); mfi.isValid(); ++mfi) // Loop over grids
{
    // This is the valid Box of the current FArrayBox.
    // By "valid", we mean the original ungrown Box in BoxArray.
    const Box& box = mfi.validbox();

    // A reference to the current FArrayBox in this loop iteration.
    FArrayBox& fab = mf[mfi];

    // Obtain Array4 from FArrayBox.  We can also do
    //     Array4<Real> const& a = mf.array(mfi);
    Array4<Real> const& a = fab.array();

    // Call function f1 to work on the region specified by box.
    // Note that the whole region of the Fab includes ghost
    // cells (if there are any), and is thus larger than or
    // equal to "box".
    f1(box, a);
}
Here function f1 might be something like below,
void f1 (Box const& bx, Array4<Real> const& a)
{
   const auto lo = lbound(bx);
   const auto hi = ubound(bx);
   for     (int k = lo.z; k <= hi.z; ++k) {
     for   (int j = lo.y; j <= hi.y; ++j) {
       for (int i = lo.x; i <= hi.x; ++i) {
         a(i,j,k) = ...
       }
     }
   }
}
MFIter only loops over grids owned by this process. For example, suppose
there are 5 Boxes in total and processes 0 and 1 own 2 and 3 Boxes,
respectively. That is the MultiFab on process 0 has 2 FArrayBoxes, whereas
there are 3 FArrayBoxes on process 1. Thus the numbers of iterations of MFIter
are 2 and 3 on processes 0 and 1, respectively.
In the example above, MultiFab is assumed to have a single
component. If it has multiple components, we can call int nc =
mf.nComp() or int nc = a.nComp() to get the number of components.
There is only one MultiFab in the example above. Below is an example of
working with multiple MultiFabs. Note that these two MultiFabs are not
necessarily built on the same BoxArray. But they must have the same
DistributionMapping, and their BoxArrays are typically related (e.g.,
they are different due to index types).
// U and F are MultiFabs
for (MFIter mfi(F); mfi.isValid(); ++mfi) // Loop over grids
{
    const Box& box = mfi.validbox();

    Array4<Real const> const& u = U.const_array(mfi);
    Array4<Real      > const& f = F.array(mfi);

    f2(box, u, f);
}
Here function f2 might be something like below,
void f1 (Box const& bx, Array4<Real const> const& u,
         Array4<Real> const& f)
{
   const auto lo = lbound(bx);
   const auto hi = ubound(bx);
   const int nf = f.nComp();
   for (int n = 0; n < nf; ++n) {
     for     (int k = lo.z; k <= hi.z; ++k) {
       for   (int j = lo.y; j <= hi.y; ++j) {
         for (int i = lo.x; i <= hi.x; ++i) {
           f(i,j,k,n) = ... u(i,j,k,n) ...
         }
       }
     }
   }
}
MFIter with Tiling
Tiling, also known as cache blocking, is a well known loop transformation technique for improving data locality. This is often done by transforming the loops into tiling loops that iterate over tiles and element loops that iterate over the data elements within a tile. For example, the original loops might look like this in Fortran
do k = kmin, kmax
  do j = jmin, jmax
    do i = imin, imax
      A(i,j,k) = B(i+1,j,k)+B(i-1,j,k)+B(i,j+1,k)+B(i,j-1,k) &
                +B(i,j,k+1)+B(i,j,k-1)-6.0d0*B(i,j,k)
    end do
  end do
end do
And the manually tiled loops might look like
jblocksize = 11
kblocksize = 16
jblocks = (jmax-jmin+jblocksize-1)/jblocksize
kblocks = (kmax-kmin+kblocksize-1)/kblocksize
do kb = 0, kblocks-1
  do jb = 0, jblocks-1
    do k = kb*kblocksize, min((kb+1)*kblocksize-1,kmax)
      do j = jb*jblocksize, min((jb+1)*jblocksize-1,jmax)
        do i = imin, imax
          A(i,j,k) = B(i+1,j,k)+B(i-1,j,k)+B(i,j+1,k)+B(i,j-1,k) &
                    +B(i,j,k+1)+B(i,j,k-1)-6.0d0*B(i,j,k)
        end do
      end do
    end do
  end do
end do
As we can see, to manually tile individual loops is very labor-intensive and
error-prone for large applications. AMReX has incorporated the tiling construct
into MFIter so that the application codes can get the benefit of tiling
easily. An MFIter loop with tiling is almost the same as the non-tiling
version. The first example in (see the previous section on
MFIter without Tiling) requires only two minor changes:
passing
truewhen definingMFIterto indicate tiling;calling
tileboxinstead ofvalidboxto obtain the work region for the loop iteration.
//               * true *  turns on tiling
for (MFIter mfi(mf,true); mfi.isValid(); ++mfi) // Loop over tiles
{
    //                   tilebox() instead of validbox()
    const Box& box = mfi.tilebox();

    FArrayBox& fab = mf[mfi];
    Array4<Real> const& a = fab.array();
    f1(box, a);
}
The second example in the previous section on MFIter without Tiling also requires only two minor changes.
//              * true *  turns on tiling
for (MFIter mfi(F,true); mfi.isValid(); ++mfi) // Loop over tiles
{
    //                   tilebox() instead of validbox()
    const Box& box = mfi.tilebox();

    Array4<Real const> const& u = U.const_array(mfi);
    Array4<Real      > const& f = F.array(mfi);
    f2(box, u, f);
}
The kernels functions like f1 and f2 in the two examples here
usually require very little changes.
|
|
Example of cell-centered valid boxes.
There are two valid boxes in this example.
Each has \(8^2\) cells.
|
Example of cell-centered tile boxes. Each grid
is logically broken into 4 tiles, and each tile
as \(4^2\) cells. There are 8 tiles in total.
|
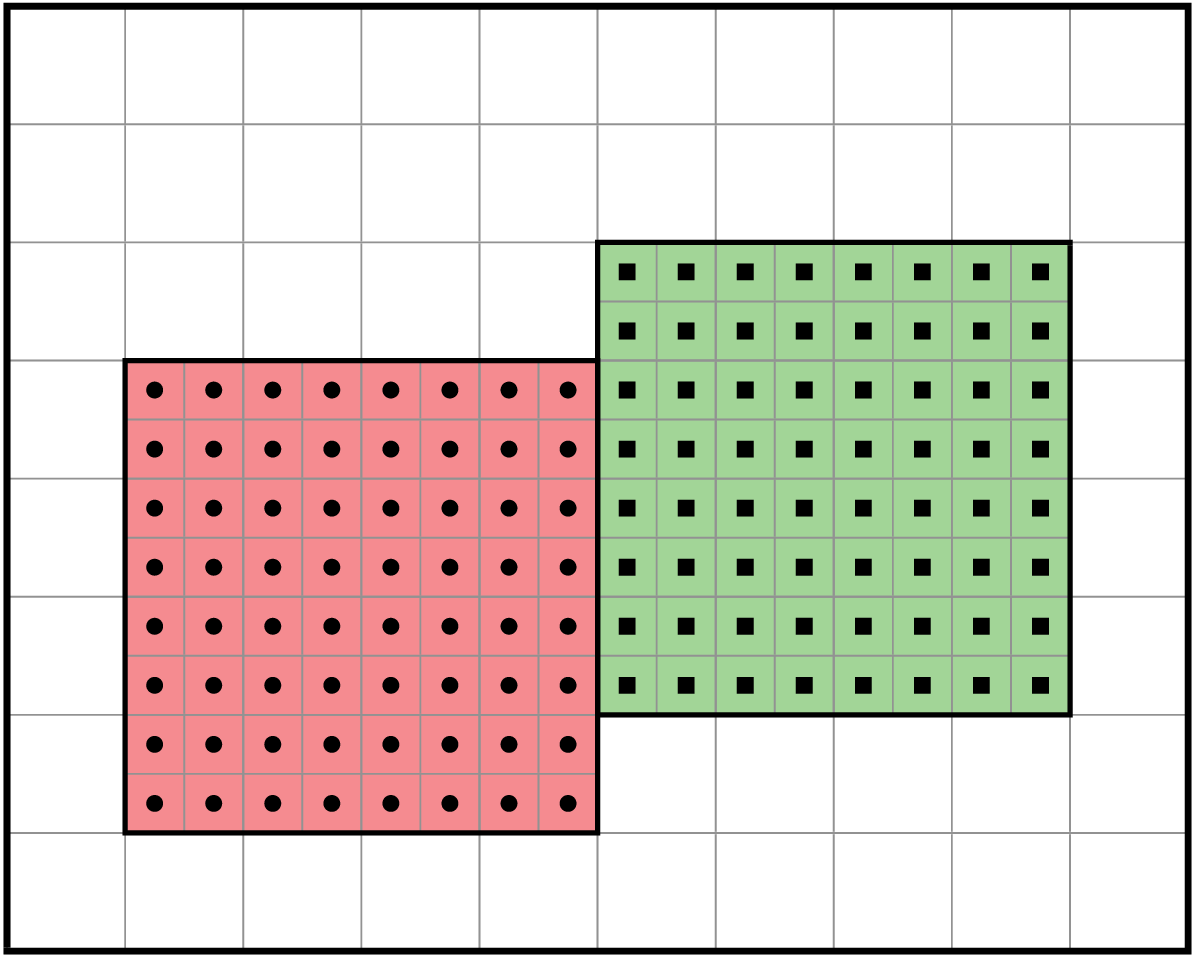
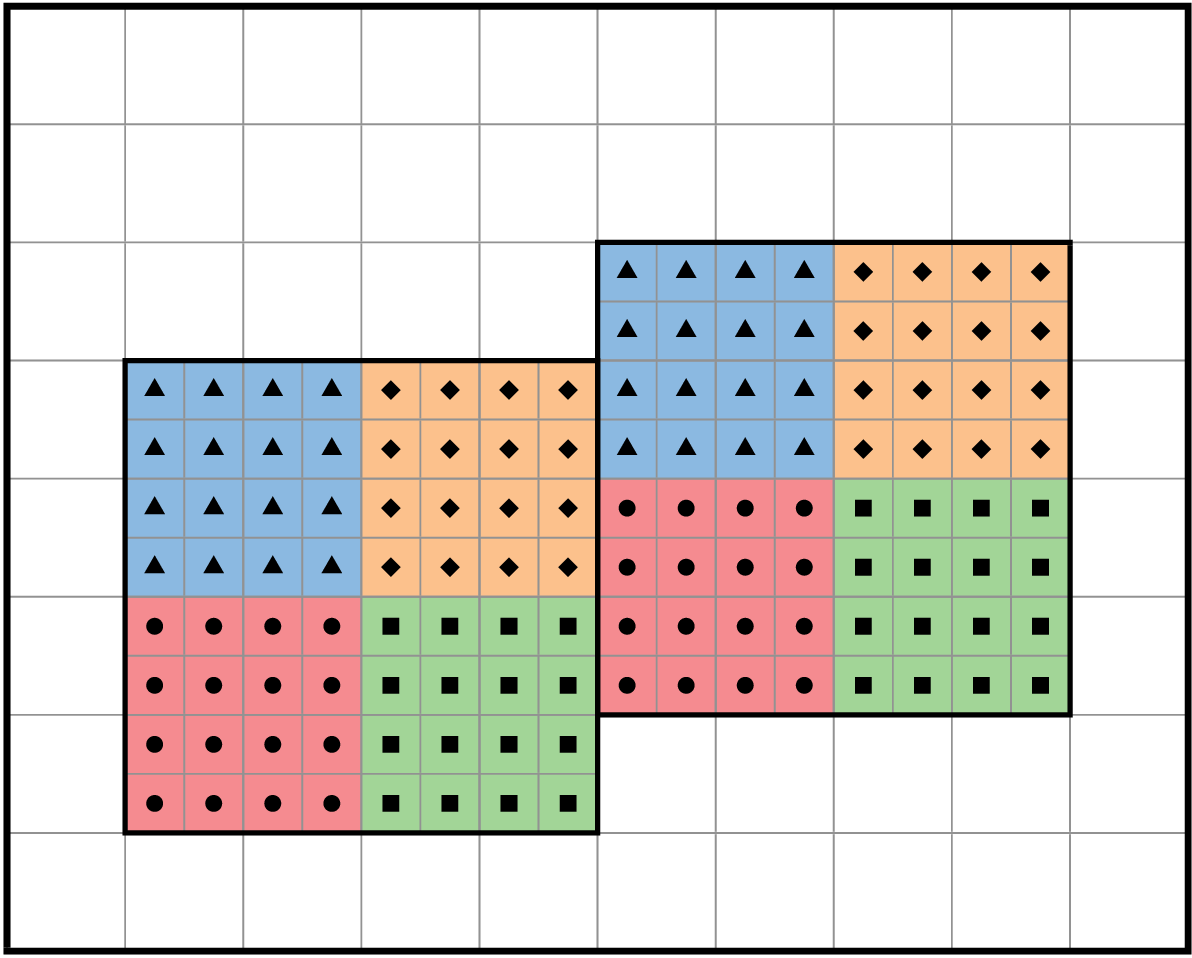
Table 6 shows an example of the difference between
validbox and tilebox. In this example, there are two grids of
cell-centered index type. The function validbox always returns a
Box for the valid region of an FArrayBox no matter whether or not
tiling is enabled, whereas the function tilebox returns a Box for
a tile. (Note that when tiling is disabled, tilebox returns the same
Box as validbox.) The number of loop iteration is 2 in the
non-tiling version, whereas in the tiling version the kernel function is called
8 times.
It is important to use the correct Box when implementing tiling, especially
if the box is used to define a work region inside of the loop. For example:
// MFIter loop with tiling on.
for (MFIter mfi(mf,true); mfi.isValid(); ++mfi)
{
    Box bx = mfi.validbox();     // Gets box of entire, untiled region.
    calcOverBox(bx);             // ERROR! Works on entire box, not tiled box.
                                 // Other iterations will redo many of the same cells.
}
The tile size can be explicitly set when defining MFIter.
// No tiling in x-direction. Tile size is 16 for y and 32 for z.
for (MFIter mfi(mf,IntVect(1024000,16,32)); mfi.isValid(); ++mfi) {...}
An IntVect is used to specify the tile size for every dimension. A tile
size larger than the grid size simply means tiling is disabled in that
direction. AMReX has a default tile size IntVect{1024000,8,8} in 3D and
no tiling in 2D. This is used when tile size is not explicitly set but the
tiling flag is on. One can change the default size using ParmParse
(section ParmParse) parameter fabarray.mfiter_tile_size.
|
|
Example of face valid boxes. There are two
valid boxes in this example. Each has
\(9\times 8\) points. Note that points in one
Box may overlap with points in the otherBox. However, the memory locations forstoring floating-point data of those points do
not overlap, because they belong to separate
FArrayBoxes.
|
Example of face tile boxes. Each grid is
logically broken into 4 tiles as indicated by
the symbols. There are 8 tiles in total. Some
tiles have \(5\times 4\) points, whereas
others have \(4 \times 4\) points. Points from
different Boxes may overlap, but points from
different tiles of the same Box do not.
|

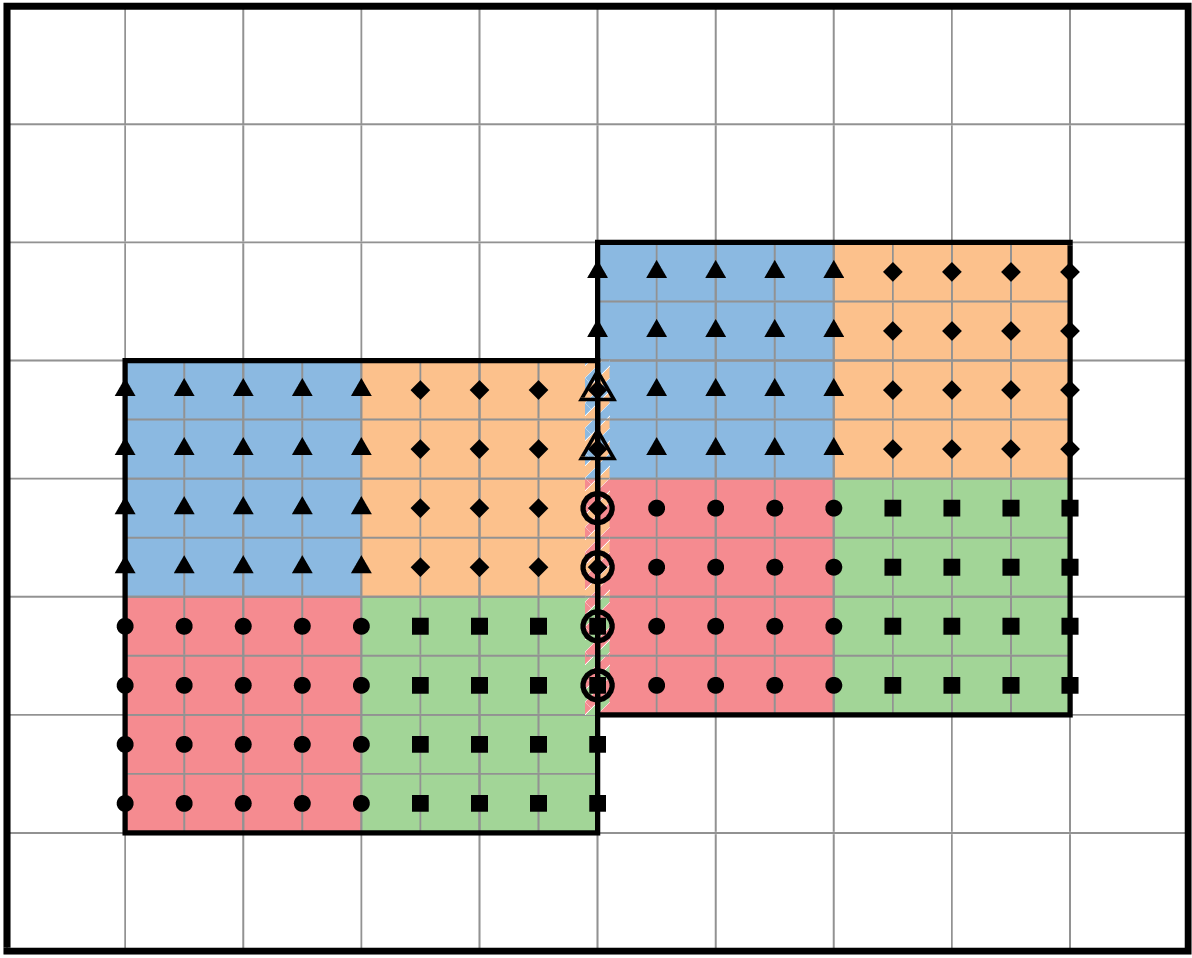
Dynamic tiling, which runs one box per OpenMP thread, either with or without
tiling the box, is also available.
This is useful when the underlying work cannot benefit from thread
parallelization. Dynamic tiling is implemented using the MFItInfo
object and requires the MFIter loop to be defined in an OpenMP
parallel region:
// Dynamic tiling, one box per OpenMP thread.
// No further tiling details,
//   so each thread works on a single tilebox.
#ifdef AMREX_USE_OMP
#pragma omp parallel
#endif
    for (MFIter mfi(mf,MFItInfo().SetDynamic(true)); mfi.isValid(); ++mfi)
    {
        const Box& bx = mfi.validbox();
        ...
    }
Dynamic tiling also allows explicit definition of a tile size:
// Dynamic tiling, one box per OpenMP thread.
// No tiling in x-direction. Tile size is 16 for y and 32 for z.
#ifdef AMREX_USE_OMP
#pragma omp parallel
#endif
    for (MFIter mfi(mf,MFItInfo().SetDynamic(true).EnableTiling(1024000,16,32)); mfi.isValid(); ++mfi)
    {
        const Box& bx = mfi.tilebox();
        ...
    }
Note that EnableTiling(), with no argument, will use the default tile size.
Usually MFIter is used for accessing multiple MultiFabs, like
the second example in the previous section on MFIter without Tiling
in which two MultiFabs, U and F, use MFIter via
array() and const_array() functions. These different MultiFabs
may have different BoxArrays. For
example, U might be cell-centered, whereas F might be nodal in
\(x\)-direction and cell in other directions. The MFIter::validbox
and tilebox functions return Boxes of the same type as the
MultiFab used in defining the MFIter (F in this example).
Table 7 illustrates an example of non-cell-centered
valid and tile boxes. Besides validbox and tilebox, MFIter
has a number of functions returning various Boxes. Examples include,
Box fabbox() const;       // Return the Box of the FArrayBox

// Return grown tile box.  By default it grows by the number of
// ghost cells of the MultiFab used for defining the MFIter.
Box growntilebox(int ng=-1000000) const;

// Return tilebox with provided nodal flag as if the MFIter
// is constructed with MultiFab of such flag.
Box tilebox(const IntVect& nodal_flag);
It should be noted that the function growntilebox does not grow the tile
Box like a normal Box. Growing a Box normally means the Box is
extended in every face of every dimension. However, the function
growntilebox only extends the tile Box in such a way that tiles from the
same grid do not overlap. This is the basic design principle of these various
tiling functions. Tiling is a way of domain decomposition for work sharing.
Overlapping tiles is undesirable because work would be wasted and for
multi-threaded codes race conditions could occur.
|
|
Example of cell-centered grown tile boxes. As
indicated by symbols and colors, there are 4
tiles per grid in this example. Tiles from the
same grid do not overlap. But tiles from
different grids may overlap.
|
Example of face type grown tile boxes. As
indicated by symbols and colors, there are 4 tiles
per grid in this example. Tiles from the
same grid do not overlap even though they
have face index type.
|

Table 8 illustrates an example of
growntilebox. These functions in MFIter return Box by
value. There are three ways of using these functions.
const Box& bx = mfi.validbox();  // const& to temporary object is legal

// Make a copy if Box needs to be modified later.
// Compilers can optimize away the temporary object.
Box bx2 = mfi.validbox();
bx2.surroundingNodes();

Box&& bx3 = mfi.validbox(); // bound to the return value
bx3.enclosedCells();
But Box& bx = mfi.validbox() is not legal and will not compile.
Finally it should be emphasized that tiling should not be used when running on GPUs because of kernel launch overhead.
Multiple MFIters
To avoid some common bugs, it is not allowed to have multiple active
MFIter objects like below by default.
for (MFIter mfi1(...); ...) {
    for (MFIter mfi2(...); ...) {
    }
}
call amrex_mfiter_build(mf1, ...)
call amrex_mfiter_build(mf2, ...)
This will result in an assertion failure at runtime. To disable the assertion, one could call
int old_flag = amrex::MFIter::allowMultipleMFIters(true);
logical :: old_flag
old_flag = amrex_mfiter_allow_multiple(.true.)
Fortran and C++ Kernels
In the section on MFIter and Tiling, we have shown that a typical
pattern for working with MultiFabs is to use MFIter to iterate over the
data. In each iteration, a kernel function is called to work on the data and
the work region is specified by a Box. When tiling is used, the work
region is a tile. The tiling is logical in the sense that there is no data
layout transformation. The kernel function still gets the whole arrays in
FArrayBoxes, even though it is supposed to work on a tile region of the
arrays. We have shown examples of writing kernels in C++ in the
previous section. Fortran is also often used for writing these kernels because of its
native multi-dimensional array support. To C++, these kernel functions are
C functions, whose function signatures are typically declared in a header file
named *_f.H or *_F.H. We recommend the users to follow this convention.
Examples of these function declarations are as follows.
#include <AMReX_BLFort.H>
#ifdef __cplusplus
extern "C"
{
#endif
    void f1(const int*, const int*, amrex_real*, const int*, const int*);
    void f2(const int*, const int*,
            const amrex_real*, const int*, const int*, const int*
            amrex_real*, const int*, const int*, const int*);
#ifdef __cplusplus
}
#endif
These Fortran functions take C pointers and view them
as multi-dimensional arrays of the shape specified by the additional integer
arguments. Note that Fortran takes arguments by reference unless the
value keyword is used. So an integer argument on the Fortran side
matches an integer pointer on the C++ side. Thanks to Fortran 2003, function
name mangling is easily achieved by declaring the Fortran function as
bind(c).
AMReX provides many macros for passing an FArrayBox’s data into Fortran/C. For example
for (MFIter mfi(mf,true); mfi.isValid(); ++mfi)
{
    const Box& box = mfi.tilebox();
    f(BL_TO_FORTRAN_BOX(box),
      BL_TO_FORTRAN_ANYD(mf[mfi]));
}
Here BL_TO_FORTRAN_BOX takes a Box and provides two int *
s specifying the lower and upper bounds of the Box. BL_TO_FORTRAN_ANYD
takes an FArrayBox returned by mf[mfi] and the preprocessor turns
it into Real *, int *, int *, where Real * is the data pointer
that matches real array argument in Fortran, the first int * (which
matches an integer argument in Fortran) specifies the lower bounds, and the
second int * the upper bounds of the spatial dimensions of the array.
An example of the Fortran function is shown below,
subroutine f(lo, hi, u, ulo, uhi) bind(c)
  use amrex_fort_module, only : amrex_real
  integer, intent(in) :: lo(3),hi(3),ulo(3),uhi(3)
  real(amrex_real),intent(inout)::u(ulo(1):uhi(1),ulo(2):uhi(2),ulo(3):uhi(3))
end subroutine f
Here, the size of the integer arrays is 3, the maximal number of spatial
dimensions. If the actual spatial dimension is less than 3, the values in the
degenerate dimensions are set to zero. So the Fortran function interface does
not have to change according to the spatial dimensionality, and the bound of
the third dimension of the data array simply becomes 0:0. With the
data passed by BL_TO_FORTRAN_BOX and BL_FORTRAN_ANYD, this
version of Fortran function interface works for any spatial dimensions. If one
wants to write a special version just for 2D and would like to use 2D arrays,
one can use
subroutine f2d(lo, hi, u, ulo, uhi) bind(c)
  use amrex_fort_module, only : amrex_real
  integer, intent(in) :: lo(2),hi(2),ulo(2),uhi(2)
  real(amrex_real),intent(inout)::u(ulo(1):uhi(1),ulo(2):uhi(2))
end subroutine f2d
Note that this does not require any changes in the C++ part, because when C++ passes an integer pointer pointing to an array of three integers Fortran can treat it as a 2-element integer array.
Another commonly used macro is BL_TO_FORTRAN. This macro takes an
FArrayBox and provides a real pointer for the floating-point data array
and a number of integer scalars for the bounds. However, the number of the
integers depends on the dimensionality. More specifically, there are 6 and 4
integers for 2D and 3D, respectively. The first half of the integers are the
lower bounds for each spatial dimension and the second half the upper bounds.
For example,
subroutine f2d(u, ulo1, ulo2, uhi1, uhi2) bind(c)
  use amrex_fort_module, only : amrex_real
  integer, intent(in) :: ulo1, ulo2, uhi1, uhi2
  real(amrex_real),intent(inout)::u(ulo1:uhi1,ulo2:uhi2)
end subroutine f2d

subroutine f3d(u, ulo1, ulo2, ulo3, uhi1, uhi2, uhi3) bind(c)
  use amrex_fort_module, only : amrex_real
  integer, intent(in) :: ulo1, ulo2, ulo3, uhi1, uhi2, uhi3
  real(amrex_real),intent(inout)::u(ulo1:uhi1,ulo2:uhi2,ulo3:uhi3)
end subroutine f3d
Here for simplicity we have omitted passing the tile Box.
Usually MultiFabs have multiple components. Thus we often also need to
pass the number of component into Fortran functions. We can obtain the number
by calling the MultiFab::nComp() function, and pass it to
Fortran. We can also use the
BL_TO_FORTRAN_FAB macro that is similar to BL_TO_FORTRAN_ANYD
except that it provides an additional int * for the number of
components. The Fortran function matching BL_TO_FORTRAN_FAB(fab) is then
like below,
subroutine f(u, ulo, uhi,nu) bind(c)
  use amrex_fort_module, only : amrex_real
  integer, intent(in) :: lo(3),hi(3),ulo(3),uhi(3),nu
  real(amrex_real),intent(inout)::u(ulo(1):uhi(1),ulo(2):uhi(2),ulo(3):uhi(3),nu)
end subroutine f
There is a potential type safety issue when calling Fortran functions from C++. If there is a mismatch between the function declaration on the C++ side and the function definition in Fortran, the compiler cannot catch it. For example
// function declaration
extern "C" {
    void f (amrex_real* x);
}

for (MFIter mfi(mf,true); mfi.isValid(); ++mfi)
{
    f(mf[mfi].dataPtr()));
}

! Fortran definition
subroutine f(x,y) bind(c)
    implicit none
    integer x, y
end subroutine f
The code above will compile without errors even though the number of arguments and types don’t match.
To help detect this kind of issue, AMReX provides a type check tool. Note that it only works when GCC is used. In the directory where an AMReX- based code is compiled, type
make typecheck
Extra arguments used in a usual AMReX build (e.g., USE_MPI=TRUE DIM=2) can be added. When it finishes, the output may look like,
Function my_f in main_F.H vs. Fortran procedure in f.f90
    number of arguments 1 does NOT match 2.
    arg #1: C type ['double', 'pointer'] does NOT match Fortran type ('INTEGER 4', 'pointer', 'x').
22 functions checked, 1 error(s) found.  More details can be found in tmp_build_dir/t/3d.gnu.DEBUG.EXE/amrex_typecheck.ou.
It should be noted that Fortran by default passes argument by
reference. In the example output above, pointer in Fortran type
('INTEGER 4', 'pointer', 'x') means it’s a reference to argument
(i.e., C pointer), not a Fortran pointer.
The type check tool has known limitations. For a function to be
checked by the tool in the GNU Make build system, the declaration must
be in a header file named *_f.H or *_F.H, and the header file
must be in the CEXE_headers make variable. The headers are
preprocessed first by cpp as C code, and then parsed by
pycparser (https://pypi.python.org/pypi/pycparser) that needs to be
installed on your system. Because pycparser is a C parser, C++ parts
of the headers (e.g., extern "C" {) need to be hidden with
macro #ifdef __cplusplus. Headers like AMReX_BLFort.H can
be used as a C header, but most other AMReX headers cannot and should
be hidden by #ifdef __cplusplus if they are included. More
details can be found at amrex/Docs/Readme.typecheck. Despite
these limitations, it is recommended to use the type check tool and
report issues to us.
Although Fortran has native multi-dimensional arrays, we recommend
writing kernels in C++ because of performance portability for CPU and
GPU. AMReX provides a multi-dimensional array syntax, similar
to Fortran, that is readable and easy to implement. We have
demonstrated how to use Array4 in previous sections. Because
of its importance, we will summarize its basic usage again with the
example below.
void f (Box const& bx, FArrayBox const& sfab, FArrayBox& dfab)
{
    const Dim3 lo = amrex::lbound(bx);
    const Dim3 hi = amrex::ubound(bx);

    Array4<Real const> const& src = sfab.const_array();
    Array4<Real      > const& dst = dfab2.array();

    for         (int k = lo.z; k <= hi.z; ++k) {
        for     (int j = lo.y; j <= hi.y; ++j) {
            AMREX_PRAGMA_SIMD
            for (int i = lo.x; i <= hi.x; ++i) {
                dst(i,j,k) = 0.5*(src(i,j,k)+src(i+1,j,k));
            }
        }
    }
}

for (MFIter mfi(mf1,true); mfi.isValid(); ++mfi)
{
    const Box& box = mfi.tilebox();
    f(box, mf1[mfi], mf2[mfi]);
}
A Box and two FArrayBoxes are passed to a C++ kernel
function. In the function, amrex::lbound and amrex::ubound
are called to get the start and end of the loops from Box::smallEnd()
and Box::bigEnd of bx. Both functions return a
amrex::Dim3, a trivial type containing three integers.
The individual components are accessed by using .x, .y and
.z, as shown in the for loops.
BaseFab::array() is called to obtain an Array4 object that is
designed as an independent, operator() based accessor to the
BaseFab data. Array4 is an AMReX class that contains a
pointer to the FArrayBox data and two Dim3 structs that
contain the bounds of the FArrayBox. The bounds are stored to
properly translate the three dimensional coordinates to the appropriate
location in the one-dimensional array. Array4's operator()
can also take a fourth integer to access across states of the
FArrayBox. When AMReX is built for 1D or 2D, it can be used
by passing 0 to the missing dimensions.
The AMREX_PRAGMA_SIMD macro is placed in the innermost loop to notify
the compiler that loop iterations are independent and it is safe to
vectorize the loop. This should be done whenever possible to achieve the
best performance. Be aware: the macro generates a compiler dependent
pragma, so their exact effect on the resulting code is also compiler
dependent. It should be emphasized that using the AMREX_PRAGMA_SIMD
macro on loops that are not safe for vectorization may lead to errors,
so if unsure about the independence of the iterations of a
loop, test and verify before adding the macro.
These loops should usually use i <= hi.x, not i < hi.x, when
defining the loop bounds. If not, the highest index cells will be left out
of the calculation.
ParallelFor
In the examples so far, we have explicitly written out the for loops
when we iterate over a Box. AMReX also provides function
templates for writing these in a concise and performance portable way
like below,
#ifdef AMREX_USE_OMP
#pragma omp parallel if (Gpu::notInLaunchRegion())
#endif
  for (MFIter mfi(mfa,TilingIfNotGPU()); mfi.isValid(); ++mfi)
  {
    const Box& bx = mfi.tilebox();
    Array4<Real> const& a = mfa[mfi].array();
    Array4<Real const> const& b = mfb[mfi].const_array();
    Array4<Real const> const& c = mfc[mfi].const_array();
    ParallelFor(bx, [=] AMREX_GPU_DEVICE (int i, int j, int k)
    {
      a(i,j,k) += b(i,j,k) * c(i,j,k);
    });
  }
Here, ParallelFor takes two arguments. The first argument is a
Box specifying the iteration index space, and the second
argument is a C++ lambda function that works on cell (i,j,k).
Variables a, b and c in the lambda function are captured by value from
the enclosing scope. The code above is performance portable. It
works with and without GPU support. When AMReX is built with GPU support,
AMREX_GPU_DEVICE indicates that the lambda function is a device
function and ParallelFor launches a GPU kernel to do the work.
When it is built without GPU support, AMREX_GPU_DEVICE has no effects
whatsoever. More details on ParallelFor will be presented in
section Launching C++ nested loops. It should be emphasized that
ParallelFor does not start an OpenMP parallel region. The OpenMP parallel
region will be started by the pragma above the MFIter loop if it is
built with OpenMP and without enabling GPU. Tiling is turned off if
GPU is enabled so that more parallelism is exposed to GPU kernels.
Also note that when tiling is off, tilebox returns
validbox.
There are other versions of ParallelFor,
// 1D for loop
ParallelFor(N, [=] AMREX_GPU_DEVICE (int i) { ... });

// 4D for loop
ParallelFor(box, numcomps,
            [=] AMREX_GPU_DEVICE (int i, int j, int k, int n) { ... });
Ghost Cells
AMReX uses a MultiFab as a container for floating-point data on
multiple Boxes at a single level of refinement. Each rectangular Box has its own boundaries
on the low and high side in each coordinate direction.
Each Box within a MultiFab can have ghost cells for storing data outside
the Box’s valid region. This allows us to, e.g., perform stencil-type operations on
regular arrays. There are three basic types of boundaries:
interior boundary
coarse/fine boundary
physical boundary
Interior boundary is the border among the grid Boxes themselves. For example,
in Fig. 1, the two blue grid Boxes on level 1 share an
interior boundary that is 10 cells long. For a MultiFab with ghost cells
on level 1, we can use the MultiFab::FillBoundary function introduced in
the section on FabArray, MultiFab and iMultiFab to fill ghost cells at the interior
boundary with valid cell data from other Boxes. MultiFab::FillBoundary
can optionally fill periodic boundary ghost cells as well.
A coarse/fine boundary is the border between two AMR levels.
FillBoundary does not fill these ghost cells. These ghost cells on the
fine level need to be interpolated from the coarse level data. This is a
subject that will be discussed in the section on FillPatchUtil and Interpolater.
Note that periodic boundary is not considered a basic type in the discussion here because after periodic transformation it becomes either interior boundary or coarse/fine boundary.
The third type of boundary is the physical boundary at the physical domain. Note that both coarse and fine AMR levels could have grids touching the physical boundary. It is up to the application codes to properly fill the ghost cells at the physical boundary. However, AMReX does provide support for some common operations. See the section on Boundary Conditions for a discussion on domain boundary conditions in general, including how to implement physical (non-periodic) boundary conditions.
Boundary Conditions
This section describes how to implement domain boundary conditions in AMReX. A ghost cell that is outside of the valid region can be thought of as either “interior” (which includes periodic and coarse-fine ghost cells), or “physical”. Physical boundary conditions can occur on domain boundaries and can be characterized as inflow, outflow, slip/no-slip walls, etc., and are ultimately linked to mathematical Dirichlet or Neumann conditions.
The basic idea behind physical boundary conditions is as follows:
Create a
BCRecobject, which is essentially a multidimensional integer array of2*DIMcomponents. Each component defines a boundary condition type for the lo/hi side of the domain, for each direction. Seeamrex/Src/Base/AMReX_BC_TYPES.Hfor common physical and mathematical types. Below is an example of setting up aVector<BCRec>for multiple components before the call to ghost cell routines.// Set up BC; see ``amrex/Src/Base/AMReX_BC_TYPES.H`` for supported types Vector<BCRec> bc(phi.nComp()); for (int n = 0; n < phi.nComp(); ++n) { for (int idim = 0; idim < AMREX_SPACEDIM; ++idim) { if (geom.isPeriodic(idim)) { bc[n].setLo(idim, BCType::int_dir); // interior bc[n].setHi(idim, BCType::int_dir); } else { bc[n].setLo(idim, BCType::foextrap); // first-order extrapolation bc[n].setHi(idim, BCType::foextrap); } } }
amrex::BCTypehas the following types,- int_dir
Interior, including periodic boundary
- ext_dir
“External Dirichlet”. It is the user’s responsibility to write a routine to fill ghost cells (more details below). The boundary location is on the domain face even when the data inside the domain are cell-centered.
- ext_dir_cc
“External Dirichlet”. It is the user’s responsibility to write a routine to fill ghost cells (more details below). The boundary location is at the cell center of ghost cells outside the domain.
- foextrap
“First Order Extrapolation” First order extrapolation from last cell in interior.
- hoextrap
“High Order Extrapolation”. The boundary location is on the domain face even when the data inside the domain are cell-centered.
- hoextrapcc
“High Order Extrapolation” The boundary location is at the cell center of ghost cells outside the domain.
- reflect_even
Reflection from interior cells with sign unchanged, \(q(-i) = q(i)\).
- reflect_odd
Reflection from interior cells with sign changed, \(q(-i) = -q(i)\).
- user_1, user_2 and user_3
“User”. It is the user’s responsibility to write a routine to fill ghost cells (more details below).
For external Dirichlet and user boundaries, the user needs to provide a callable object like below.
struct MyExtBCFill {
    AMREX_GPU_DEVICE
    void operator() (const IntVect& iv, Array4<Real> const& dest,
                     const int dcomp, const int numcomp,
                     GeometryData const& geom, const Real time,
                     const BCRec* bcr, const int bcomp,
                     const int orig_comp) const
    {
        // external Dirichlet or user BC for cell iv
    }
};
Here, for the CPU build, the AMREX_GPU_DEVICE macro has no effect whatsoever, whereas for the GPU build, this marks the operator as a GPU device function.
It is the user’s responsibility to have a consistent definition of what the ghost cells represent. A common option used in AMReX codes is to fill the domain ghost cells with the value that lies on the boundary (as opposed to another common option where the value in the ghost cell represents an extrapolated value based on the boundary condition type). Then in our stencil based “work” codes, we also pass in the
BCRecobject and use modified stencils near the domain boundary that know the value in the first ghost cell represents the value on the boundary.
Depending on the level of complexity of your code, there are various options for filling domain boundary ghost cells.
For single-level codes built from amrex/Src/Base (excluding the
amrex/Src/AmrCore and amrex/Src/Amr source code directories), you will
have single-level MultiFabs filled with data in the valid region where you need
to fill the ghost cells on each grid.
MultiFab mf;
Geometry geom;
Vector<BCRec> bc;
Real time;

// ...

// fills interior and periodic domain boundary ghost cells
mf.FillBoundary(geom.periodicity());

// fills physical domain boundary ghost cells for a cell-centered multifab
if (not geom.isAllPeriodic()) {
    GpuBndryFuncFab<MyExtBCFill> bf(MyExtBCFill{});
    PhysBCFunct<GpuBndryFuncFab<MyExtBCFill> > physbcf(geom, bc, bf);
    physbcf(mf, 0, mf.nComp(), mf.nGrowVector(), time, 0);
}
Masks
Given an index (i,j,k), we often need to know its relationship with
other points and levels (e.g., whether this point on a coarse level is
covered by a fine level, whether this ghost point is outside coarse/fine
boundary, etc.). AMReX provides various functions for creating masks for
this type of purposes.
Owner Mask
AMReX supports various index types such as face, edge and node, besides cell
centered type. For non-cell types, two boxes could overlap. For example, a
nodal index (i,j,k) could exist in more than one FArrayBox of
a nodal MultiFab. AMReX provides a function to create an owner mask,
where the owner is the grid with the lowest grid number containing the data.
This has a number of use cases. The nodal data for the same nodal point on
different FArrayBoxes may be out of sync. We can use
MultiFab::OverrideSync and an owner mask to sync up the data with
owners overriding non-owners.
MultiFab mf(...); // non-cell-centered
auto mask = amrex::OwnerMask(mf, geom.periodicity());
mf.OverrideSync(*mask, geom.periodicity());
This version of OverrideSync offers the flexibility of providing a custom mask.
However, when a custom mask is not needed, we can synchronize the data also with
MultiFab mf(...); // non-cell-centered
mf.OverrideSync(geom.periodicity());
This version of OverrideSync has better performance than the previous one.
To compute the dot product of two nodal MultiFabs, we can use a
mask to avoid double counting.
MultiFab mf1(...);
MultiFab mf2(...);
auto mask = amrex::OwnerMask(mf1, geom.periodicity());
Real result = MultiFab::Dot(*mask, mf1, 0, mf2, 0, 1, 0);
Overlap Mask
For the synchronization example mentioned previously, maybe instead of
overriding, we want to do averaging. This can be achieved with an overlap
mask indicating how many duplicates are in each point. The code below shows
how the MultiFab::AverageSync function is implemented in AMReX.
MultiFab mf(...); // non-cell-centered
auto mask = mf.OverlapMask(geom.periodicity());
mask->invert(1.0, 0, 1);
mf.WeightedSync(*mask, geom.periodicity());
Point Mask
The FabArray class has a member function BuildMask that can be
used to set masks indicating the type of points (e.g., valid, outside the
domain, etc.). For example,
iMultiFab mask(ba, dm, 1, nghost);
int a = 10; // ghost points covered by valid points
int b = 11; // ghost points not covered by valid points
int c = 12; // outside physical domain
int d = 13; // interior points (i.e., valid points)
mask.BuildMask(geom.Domain(), geom.periodicity(), a, b, c, d);
Fine Mask
AMReX provides a number of makeFineMask functions that can be useful
for multi-level AMR calculations. For example, we may want to compute the
infinity norm on a coarse AMR level without including data from cells
covered by fine level grids.
int coarse_value = 1;
int fine_value = 0;
iMultiFab mask = makeFineMask(coarse_mf, fine_boxarray, refine_ratio,
                              coarse_value, fine_value);
Real result = coarse_mf.norminf(mask);
Memory Allocation
Some constructors of MultiFab, FArrayBox, etc. can take an
Arena argument for memory allocation. Some constructors of
MultiFab can take an optional argument MFInfo, which can be
used to set the arena. This is usually not important for CPU codes, but
very important for GPU codes. We will present more details about memory
arenas in Memory Allocation in Chapter GPU.
Every FArrayBox in a MultiFab has a contiguous chunk of memory
for floating-point data, whereas by default MultiFab, as a collection
of multiple FArrayBoxs, does not store all floating-point data in
a contiguous chunk of memory. This behavior can be changed for all
MultiFabs with the ParmParse parameter,
amrex.mf.alloc_single_chunk=1, or for a specific MultiFab by
passing a MFInfo object (e.g.,
MFInfo().SetAllocSingleChunk(true)) to the constructor. One can call
MultiFab::singleChunkPtr() to obtain a pointer to the single chunk
memory. Note that the function returns a null pointer if the MultiFab
does not use a single contiguous chunk of memory. One can also call
MultiFab::singleChunkSize() to obtain the size in bytes of the single
chunk memory.
AMReX has a Fortran module, amrex_mempool_module that can be used to
allocate memory for Fortran pointers. The reason that such a module exists in
AMReX is that memory allocation is often very slow in multi-threaded OpenMP
parallel regions. AMReX amrex_mempool_module provides a much faster
alternative approach, in which each thread has its own memory pool. Here are
examples of using the module.
use amrex_mempool_module, only : amrex_allocate, amrex_deallocate
real(amrex_real), pointer, contiguous :: a(:,:,:), b(:,:,:,:)
integer :: lo1, hi1, lo2, hi2, lo3, hi3, lo(4), hi(4)
! lo1 = ...
! a(lo1:hi1, lo2:hi2, lo3:hi3)
call amrex_allocate(a, lo1, hi1, lo2, hi2, lo3, hi3)
! b(lo(1):hi(1),lo(2):hi(2),lo(3):hi(3),lo(4):hi(4))
call amrex_allocate(b, lo, hi)
! ......
call amrex_deallocate(a)
call amrex_deallocate(b)
The downside of this is we have to use pointer instead of
allocatable. This means we must explicitly free the memory via
amrex_deallocate and we need to declare the pointers as
contiguous for performance reason. Also, we often
pass the Fortran pointer to a procedure with explicit array argument
to get rid of the pointerness completely.
Abort, Assertion and Backtrace
amrex::Abort(const char * message) is used to terminate a run usually
when something goes wrong. This function takes a message and writes it to
stderr. Files named like Backtrace.1 (where 1 means process 1)
are produced containing backtrace information of the call stack. In Fortran, we
can call amrex_abort from the amrex_error_module, which
takes a Fortran character variable with assumed size (i.e., len=*)
as a message. A ParmParse runtime boolean parameter
amrex.throw_handling (which is defaulted to 0, i.e., false)
can be set to 1 (i.e., true) so that AMReX will throw an
exception instead of aborting.
AMREX_ASSERT is a macro that takes a Boolean expression. For a debug build
(e.g., DEBUG=TRUE using the GNU Make build system), if the expression at
runtime is evaluated to false, amrex::Abort will be called and the run
is thus terminated. For an optimized build (e.g., DEBUG=FALSE using the GNU
Make build system), the AMREX_ASSERT statement is removed at compile
time and thus has no effect at runtime. We often use this as a means of putting
debug statements in the code without adding any extra cost for production runs.
For example,
AMREX_ASSERT(mf.nGrow() > 0 && mf.nComp() == mf2.nComp());
Here for debug build we like to assert that MultiFab mf has ghost cells
and it also has the same number of components as MultiFab mf2. If we
always want the assertion, we can use AMREX_ALWAYS_ASSERT. The
assertion macros have a _WITH_MESSAGE variant that will print a
message when assertion fails. For example,
AMREX_ASSERT_WITH_MESSAGE(mf.boxArray() == mf2.boxArray(),
                          "These two mfs must have the same BoxArray");
Backtrace files are produced by AMReX signal handler by default when
segfault occurs or Abort is called. If the application does not
want AMReX to handle this, ParmParse parameter
amrex.signal_handling=0 can be used to disable it.
See Assertions and Error Checking for considerations on using these functions in GPU-enabled code.